 Image by Roberto Cortese on Unsplash
Hello friends! So, I am starting a new article series based on MERN stack and this article is the first part of that series. This series will be completely focused on MERN stack (MongoDB, Express, React and Node). Previously, I have made two series which were a social media website and job search website but both of them were built on Django framework and we used Django templating engine to create the frontend for our applications at that time.
But, now we are using Full Stack Javascript to design and develop our applications. This means we would be using Node, Express and MongoDB to design the REST APIs and then we would use those APIs in our React frontend. So, it would be very beneficial since it would teach you the concepts of REST API and will help you to integrate these frameworks.
So, in this first part, we would talk about the basics of the project and also set the project up.
So, basically, it would be a simple E-Commerce website. It would not have all the bells and whistles of a complete modern E-Commerce website since this is aimed at learning and understanding how everything actually works. We can surely add features on top of this project to make it better. We would keep our design simple and minimal on Frontend side. We would not be dealing with CSS much as our focus would be on understanding how we deal with APIs on the frontend and will focus on the basics part.
We would use React Bootstrap to design our React Frontend minimally. We aim to make a working e-commerce website where everything functions correctly.
So, the features we would be having in the application that we would be building are:-
-
Authentication using JSON Web Tokens (JWT).
-
Option to add, edit, view and delete all the items in our store.
-
Option to add items or remove items from the cart.
-
Display the total bill of the cart and update it as soon as the cart is updated by the user.
-
Using Local Storage to store the JWT so that we only allow logged-in users to buy items.
-
Option to pay and checkout thus creating order and emptying the cart.
So, these are the basic features we would be having in our application. Now, let's get familiar with the tech stack we are going to use for building this application.
Frontend — In the frontend side, we would be using React as the frontend library. We would use Redux for state management. We would use React Bootstrap library for basic designing of the interface.
Backend — For the backend side, we would be using the Express library on top of Nodejs. We would use MongoDB as the NoSQL database to store our data as documents in JSON format. We would use *mongoose *to connect to our MongoDB database.
We would create REST APIs with Express and use these endpoints in the React frontend to interact with our backend part.
To learn more about creating REST APIs using Express, Node and MongoDB, check out this article which deals with it simply and elegantly.
Build a REST API with Node, Express and MongoDB
This tutorial would really help you understand REST API and you will learn how to build them easily.
Also, if you are new to React, this simple article will be really great for you to get started with React. This article details on building a simple Todo app using React. This would be good to understand CRUD (Create, Read, Update and Delete) principles.
Build a Simple Todo App using React
So, we now have an overview of what we are going to build, so we would now like to start building the project.
First, of all, we would need to download Nodejs in our system since it would then allow us to use NPM (Node Package Manager). If have not already downloaded it, here is the link to download it.
After downloading and installing Nodejs into the system, we are ready to start building the project. So, let's open up the terminal and move into the folder of our choice where we would like to create our project.
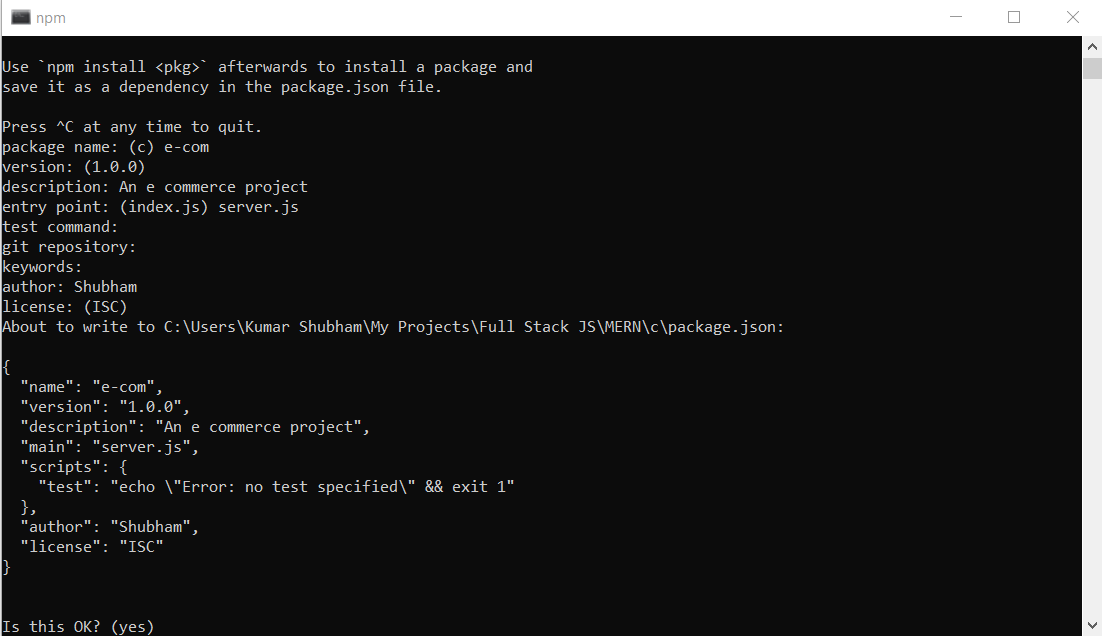
So, then we would create a new folder of any name of our choice to store all the project files. I named my folder ‘E-Commerce'. Then move into the created folder and type in the following command in the terminal to start a new Node project there.
npm init
It would then ask a series of questions like this:-
 npm init
We can choose any name for our package and we give any description of our choice, we put our name in the author section. We change the entry point from index.js to server.js as we are going to name our entry file as server.js instead of index.js. It will work like a server so naming it as such seems more reasonable. We leave all other fields blank.
When we click on *yes *then it would create a *package.json *file in that folder. Open the package.json file in the code editor of your choice. I use the VS Code for this purpose.
We would now need to install certain dependencies using *npm *which would then automatically add them as dependencies in our *package.json *file.
Here is the package.json file with all of the dependencies we would be needing for this project as of now. We would add some dependencies later on when we need to do so.
{
  "name": "e-commerce",
  "version": "1.0.0",
  "description": "An e-commerce app",
  "main": "server.js",
  "scripts": {
    "start": "node server.js",
    "server": "nodemon server.js",
    "client": "npm start --prefix client",
    "dev": "concurrently \"npm run server\" \"npm run client\""
  },
  "author": "Shubham",
  "license": "ISC",
  "dependencies": {
    "bcrypt": "^5.0.0",
    "concurrently": "^5.3.0",
    "config": "^3.3.3",
    "express": "^4.17.1",
    "jsonwebtoken": "^8.5.1",
    "mongoose": "^5.11.11",
    "validator": "^13.5.2"
  },
  "devDependencies": {
    "nodemon": "^2.0.7"
  }
}
Actually, you can copy the dependencies and dev dependencies from the *package.json *file and update your file. Then we can run *npm install *to install all the dependencies listed in the *package.json *file.
After you have installed these dependencies, let's first understand the significance of these packages which we just installed.
-
bcrypt — We will be authenticating users in our application. We would need to store the password of our users in our database. So, it is never recommended to store plain text passwords since they can be compromised easily. So, we use bcrypt library to hash the passwords before we save them. We would delve into more detail into how it works when we actually use it.
-
**concurrently **— This package helps us to run two processes at the same thus we would be able to run both our server and client at the same time without having to use two separate terminals to do so.
-
config — This is a simple package which helps us to store our important data like secret keys, database ID etc. in a separate JSON file and it allows us to access it easily within any file.
-
express — This is the library which we would use on top of Node to build our REST APIs.
-
jsonwebtoken — This helps us to create JWTs for the authentication purpose.
-
mongoose — This helps us to establish a connection between MongoDB and our Express app.
-
**validator **— It helps us to validate a few things such as emails. It is a small package and is useful for validation.
-
**nodemon **— It helps us to keep our server running and lets us rerun the server as soon as any changes are detected as we do not need to restart the server for changes to take place.
We have added a few scripts too to make it easier for us to run the server and client. Let's have a look at them:-
-
**start **— It uses node to run the server.js file. It would need to restart for updates.
-
server — It uses nodemon to run the server.js file which allows it to update changes and restart the server automatically.
-
client — Running this command runs the client. We use a prefix to let it know that we want to first move into client folder and then run the command.
-
**dev **— It uses concurrently to run both the server and client at the same time.
So, now let us create a server.js file in the root directory. Let's start building our server.js file.
So, we would start by doing all the required imports of the various libraries we would need in this file.
const express = require('express');
const mongoose = require('mongoose');
const path = require('path');
const config = require('config');
We would then call our express app and will set it to use it in our application.
const app = express();
app.use(express.json());
Next off, we will set up our server file to serve static content which will be generated from React app in production. This will only work in the production environment.
if(process.env.NODE_ENV === 'production') {
    app.use(express.static('client/build'));
    app.get('*', (req, res) => {
res.sendFile(path.resolve(__dirname,'client','build','index.html'));
    });
}
Next, we configure our server file to connect to the MongoDB database and then start running the server to listen to our requests on port 4000.
const dbURI = config.get('dbURI');
const port = process.env.PORT || 4000;
mongoose.connect(dbURI, { useNewUrlParser: true, useUnifiedTopology: true, useCreateIndex:true })
  .then((result) => app.listen(port))
  .catch((err) => console.log(err));
As you can see, we have used *config *to get our Database URI. We define a port variable to use any port value present in the environment variable as in case of production but in development, we will use port 4000.
We would then connect to our database using *mongoose *and after we successfully connect to the database, we start listening to requests on the port i.e. server is up and running.
This is the server.js file which we have built till now:-
const express = require("express");
const mongoose = require("mongoose");
const path = require("path");
const config = require("config");

const app = express();
app.use(express.json());

// used in production to serve client files
if (process.env.NODE_ENV === "production") {
  app.use(express.static("client/build"));
  app.get("*", (req, res) => {
    res.sendFile(path.resolve(__dirname, "client", "build", "index.html"));
  });
}

// connecting to mongoDB and then running server on port 4000
const dbURI = config.get("dbURI");
const port = process.env.PORT || 4000;
mongoose
  .connect(dbURI, {
    useNewUrlParser: true,
    useUnifiedTopology: true,
    useCreateIndex: true,
  })
  .then((result) => app.listen(port))
  .catch((err) => console.log(err));
We will also create a new folder named *config *in the root directory. We would then create a new file named *default.json *inside the *config *folder.
We would then store our important keys and secrets inside this file. We do so in key-value pairs.
{
"dbURI": "YOUR_DATABASE_URI",
}
We would then create different folders to keep our routes, controllers, models files. Doing so will reduce the clutter and keep our code readable and maintainable.
So, we would deal with all these things in the next parts. We would dedicate a part to the authentication to understand it in a proper sense. Next, we would deal with the models, routes and controllers related to Items, Cart and Orders in a separate part.
Completing all that would mostly sum up our backend part of the series and we would then move on to the frontend part after finishing those parts.
It is going to be an exciting series and I have the belief that we all would learn something new and productive which would help us develop our skills.
I hope you all understood this first part we dealt with in this article. I hope you all are excited about the upcoming parts!
Click here to go to the second part of the tutorial series where we deal with models of the file.
If you are excited about learning Django, I have two really good series which would help you learn and build something practical using Django. They are 5 part and 6 part series respectively.
Click here to access the GitHub repository for this complete project.
In these projects, we explore various features of Django. We also use AJAX in the social media project while we also use Social Login features (Google, Github, LinkedIn) in the Job search project. Have a look at them as these are exciting projects that you can do using Django.
Build a Social Media Website Using Django — Setup the Project (Part 1)
Comments
Loading comments…