
AWS does support NoSQL databases such as DynamoDB and DocumentDB but not MongoDB. So if you would like to host your MongoDB to the AWS cloud but do not want to migrate to another DB, you may install it yourself. In this tutorial, we learn how to install MongoDB in an EC2 Linux instance.
Step 1: Create an EC2 instance
Login to your AWS console, and navigate to EC2.
- Name: mongodb-instance
- AMI: Amazon Linux 2 AMI
- Architecture: 64-bit (x86)
- Instance type: t2.micro (Free tier)
- Key pair:
<your existing key pair or create a new one> - Security Groups: Allow SSH traffic from Anywhere (we will need this to SSH into the instance to install the MongoDB)
Step 2: Install MongoDB
Once the EC2 instance state turns to “Running”, open a terminal on the directory where you stored the key pair (.pem).
Create a /etc/yum.repos.d/mongodb-org-6.0.repo file so that you can install MongoDB directly using yum
sudo vim /etc/yum.repos.d/mongodb-org-6.0.repo####hit I to enter INSERT mode, copy and paste the following[mongodb-org-6.0]
name=MongoDB Repository
baseurl=https://repo.mongodb.org/yum/amazon/2/mongodb-org/6.0/x86%5F64/
gpgcheck=1
enabled=1
gpgkey=https://www.mongodb.org/static/pgp/server-6.0.asc ####hit esc key to exit INSERT mode, and run :wq to save the file.
Run the following command to install the latest MongoDB.
sudo yum install -y mongodb-org

Run the command below to verify MongoDB has been installed correctly.
mongod --version

We have successfully set up MongoDB in the EC2 instance. To start the MongoDB run the following command:
sudo systemctl start mongod
To verify the MongoDB has been started successfully, issue the following command:
sudo systemctl status mongod
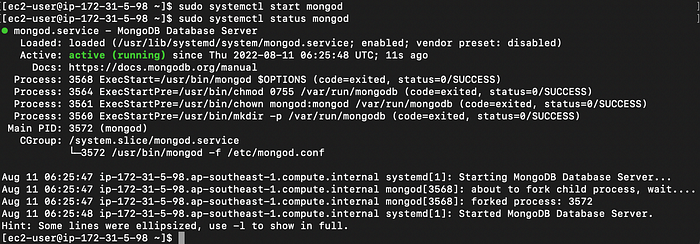 That is great, the MongoDB has been activated.
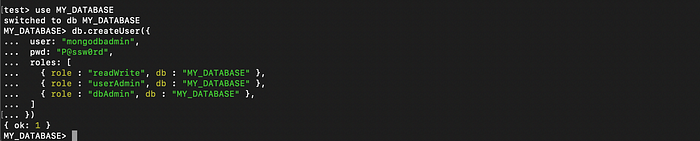
Let’s go into the MongoDB shell to create a database schema and table. Issue the command below:
That is great, the MongoDB has been activated.
Let’s go into the MongoDB shell to create a database schema and table. Issue the command below:
mongosh
Run use DATABASE_NAME to create a database. The command will create a new database if it doesn't exist, otherwise, it will return the existing database.
use MY_DATABASE
Next, create a user account.
 Now, try to insert some records into DB.
db.product.insert({
  name: "Apple",
  description: "This is an Apple",
  price: 2.50
});...
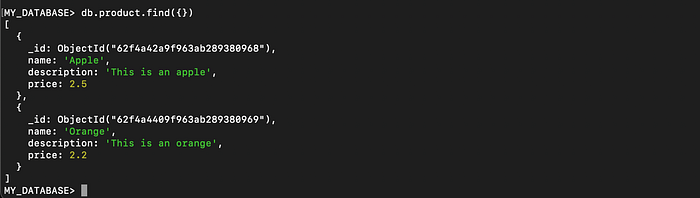
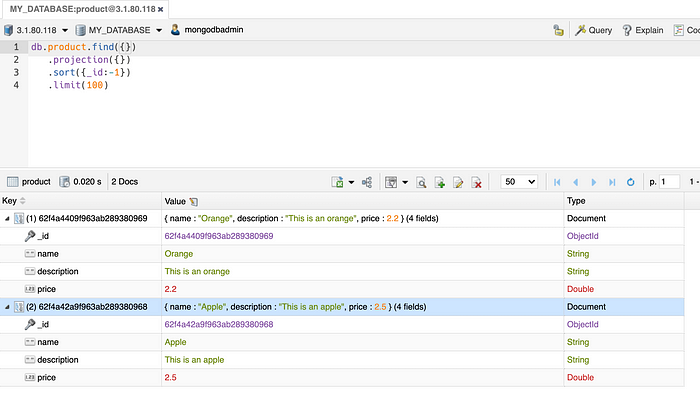
 To retrieve the inserted record by issue the query:
db.product.find({});
Additional
In some situations, we might need to access MongoDB remotely or locally. In other to allow outside connection to your MongoDB, we need to allow inbound traffic. In the instance summary page, go to the Security tab and navigate to the Security Groups
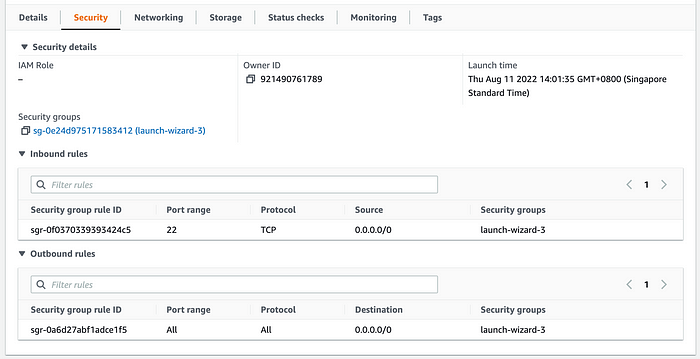 From the Inbound rules tab, click Edit inbound rules. By default, we can see the Port 22 SSH is open.
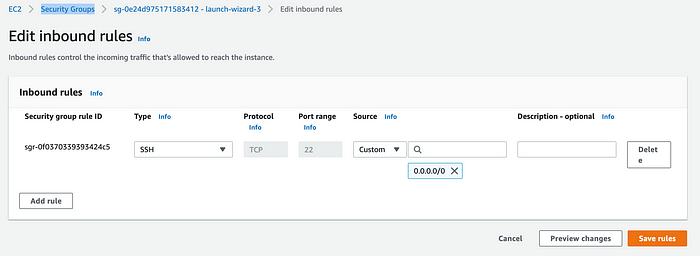 Next, add a new rule. Since MongoDB is listening to port 27017, we need the rule to allow incoming connections to this port. Save the rules.
 By default, MongoDB launches with
 [bindIp](https://www.mongodb.com/docs/manual/reference/configuration-options/#mongodb-setting-net.bindIp) set to 127.0.0.1, which binds to the localhost network interface. This means that the mongod or mongoshcan only accept connections from clients that are running on the same machine. Remote clients will not be able to connect to the mongodor mongosh .
Now run the command below to change the bindIp to allow remote IP to access:
sudo vim /etc/mongod.conf
 Enabled the security so that remote users can access MongoDB by providing a username and password.
Restart the MongoDB server by issuing the command:
Enabled the security so that remote users can access MongoDB by providing a username and password.
Restart the MongoDB server by issuing the command:
sudo systemctl restart mongod
To test the connection remotely run the command below from your local terminal if you have MongoDB installed locally:
mongo 3.1.80.118:27017/my_database -u mongodbadmin -p P@ssw0rd
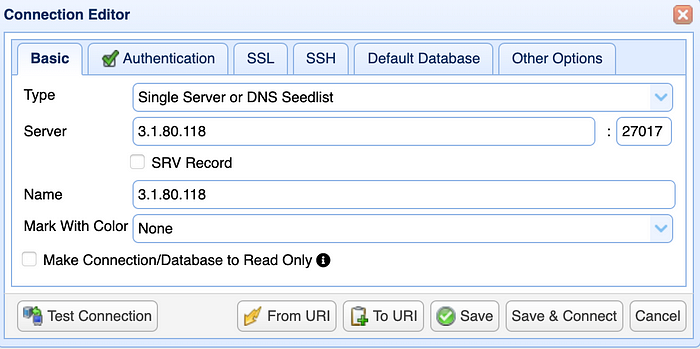
Or you may install NoSQLBooster GUI. Create a connection and enter the public IP of your EC2 as Server.
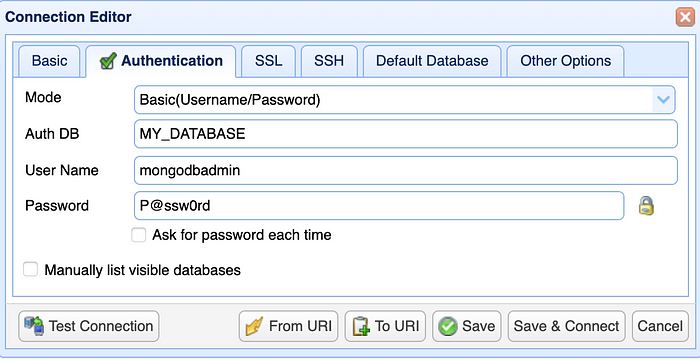
Next, navigate to the Authentication tab, and select Basic(Username/Password) as the mode. Auth DB will be your created database name.
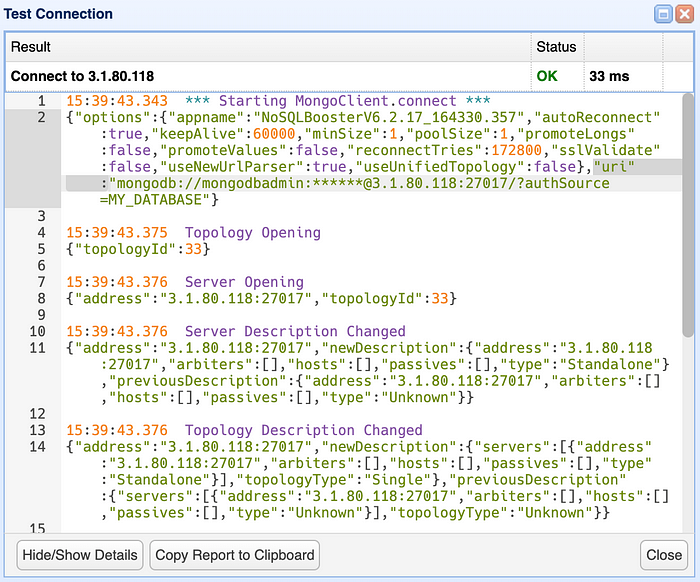
Click on the Test Connection button, you should be able to connect the MongoDB hosted in EC2.
To stop the MongoDB server issue the command:
sudo systemctl stop mongod
Great! We’ve successfully installed MongoDB in AWS EC2.
Comments
Loading comments…