
This tutorial is based on AWS CLI official documentation. Here I will show how to use these commands with practical examples. So I recommend you reference the documentation for more details, such as required and optional arguments for commands, their data types, min, and max allowed values, list of attributes, etc. All the commands in this tutorial will work with actual AWS services hosted in the cloud with little or no changes.
To manage AWS services the AWS CLI is used, so you have to install it on your PC. For simplicity, I will use a Localstack running on a Docker container using Docker Compose to create SQS on my PC. Make sure you have Docker and Docker Compose installed on your PC. The docker-compose.yaml file with a Localstack container definition is below:
version: '3.9'
services:
  localstack:
    container_name: localstack
    image: localstack/localstack:0.14.4
    ports:
      - "4566-4599:4566-4599"
    environment:
      - SERVICES=sqs
    volumes:
      - ./init/scripts:/docker-entrypoint-initaws.d
From the directory where this file is located execute the following Docker Compose command:
$docker-compose up
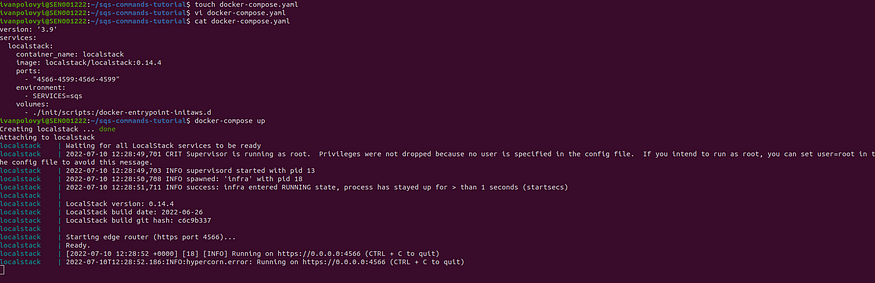
In less than a minute the container will be ready to accept commands.
More about Localstack you can find here, including how to create the resources on localstac initialization..
Create a queue:
$aws --endpoint-url=[http://localhost:4566](http://localhost:4566/)\
 sqs create-queue \
 --queue-name=tutorial-queue \
 --attributes DelaySeconds=60,\
MaximumMessageSize=200,\
MessageRetentionPeriod=3600,\
ReceiveMessageWaitTimeSeconds=5,\
VisibilityTimeout=5,\
RedrivePolicy="\"{\\\"deadLetterTargetArn\\\":\\\"arn:aws:sqs:us-east-1:000000000000:tutorial-dlq-sqs\\\",\\\"maxReceiveCount\\\":\\\"2\\\"}\""
When creating a queue we may need to specify a DLQ, so in the below example I will first create a queue and then will set it as DLQ for a subsequentially created queue, which is referred to as the source queue.

The JSON can be used to pass attributes when creating a queue:
$aws --endpoint-url=[http://localhost:4566](http://localhost:4566/)\
 sqs create-queue \
 --queue-name=tutorial-queue-attributes-as-json\
 --attributes '{
     "DelaySeconds": "60",
     "MaximumMessageSize": "200",
     "MessageRetentionPeriod": "3600",
     "ReceiveMessageWaitTimeSeconds": "5",
     "VisibilityTimeout": "5",
     "RedrivePolicy": "{\"deadLetterTargetArn\":\"arn:aws:sqs:us-east-1:000000000000:tutorial-dlq-sqs\",\"maxReceiveCount\":\"2\"}"
}'

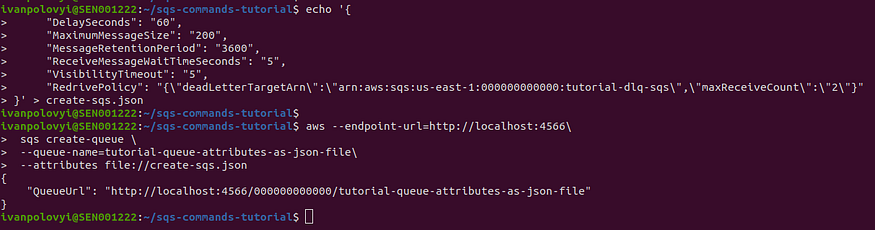
Attributes can be saved in the JSON file and then this file can be referred from the command. First, we have to create a file by executing the command:
$echo '{
     "DelaySeconds": "60",
     "MaximumMessageSize": "200",
     "MessageRetentionPeriod": "3600",
     "ReceiveMessageWaitTimeSeconds": "5",
     "VisibilityTimeout": "5",
     "RedrivePolicy": "{\"deadLetterTargetArn\":\"arn:aws:sqs:us-east-1:000000000000:tutorial-dlq-sqs\",\"maxReceiveCount\":\"2\"}"
}' > create-sqs.json
After the file is created we have to refer to it in the command:
$aws --endpoint-url=http://localhost:4566\
 sqs create-queue \
 --queue-name=tutorial-queue-attributes-as-json-file\
 --attributes file**:**//create-sqs.json
More explanation of the DLQ pattern is here.
And the DLQ pattern implementation using Spring is explained here.
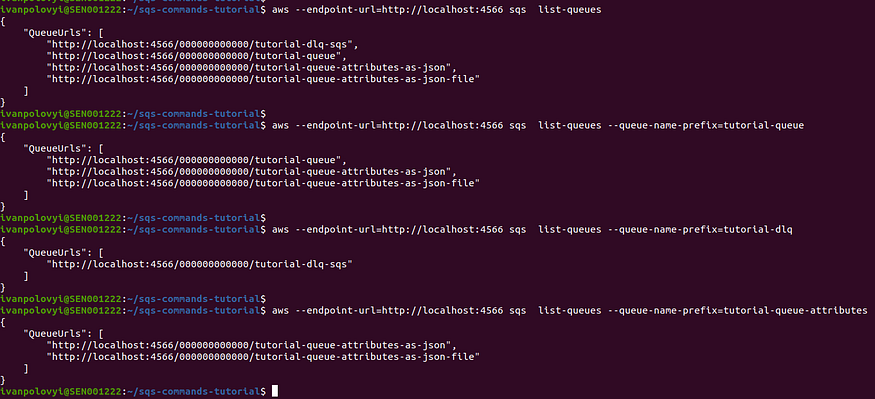
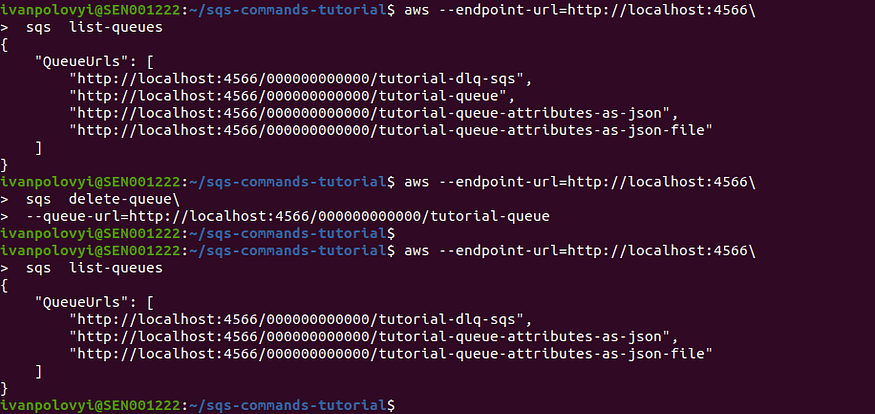
List queues:
To list all queues the below command is used. The optional filtering by prefix can be applied as well to make the result more precise:
$aws --endpoint-url=http://localhost:4566\
 sqs  list-queues\
 --queue-name-prefix=tutorial-queue
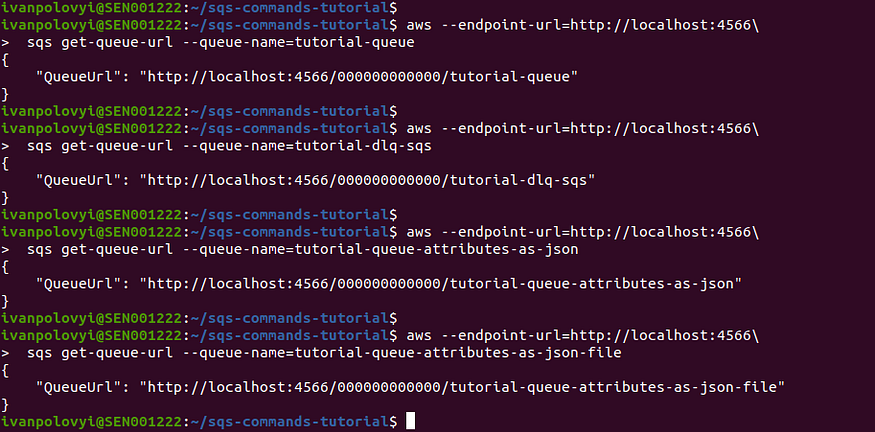
Get queue URL:
$aws --endpoint-url=http://localhost:4566\
 sqs get-queue-url --queue-name=tutorial-queue
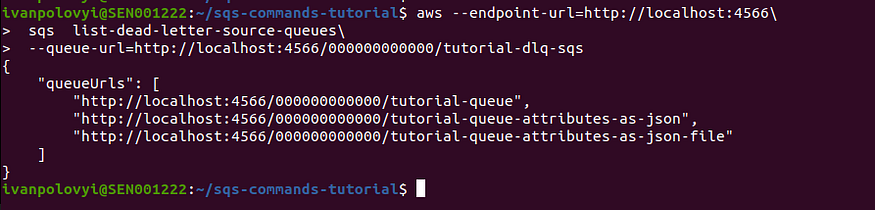
List dead letter source queues:
This command is very useful if you wanna know the queues that are the source queues for the dead letter queue (DLQ):
$aws --endpoint-url=http://localhost:4566\
 sqs  list-dead-letter-source-queues\
 --queue-url=http://localhost:4566/000000000000/tutorial-dlq-sqs
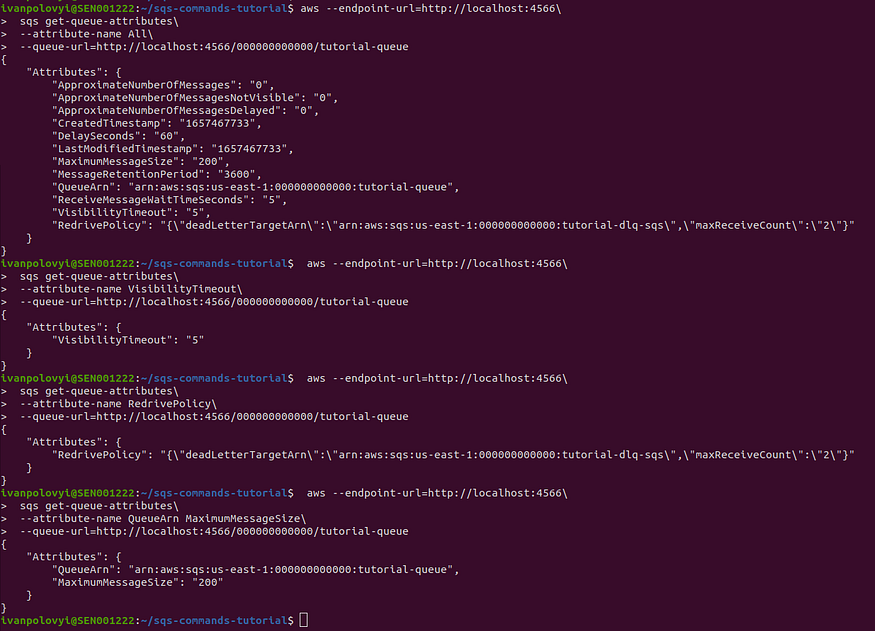
Get queue attributes:
To check queue attributes we can use the below command. This command can show all attributes at once, or we can specify needed attributes.
$aws --endpoint-url=http://localhost:4566\
 sqs get-queue-attributes\
 --attribute-name All\
 --queue-url=http://localhost:4566/000000000000/tutorial-queue
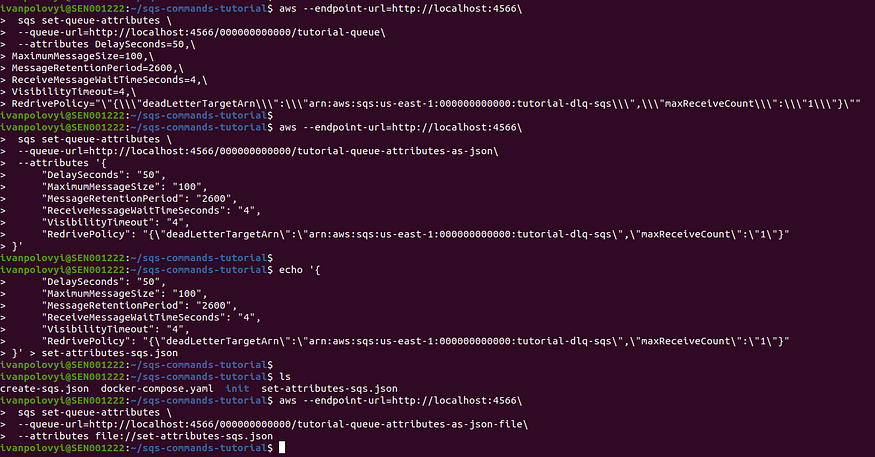
Set queue attributes:
The way to set queue attributes is similar to creating a queue. It can be done by command, referring JSON in the command, or creating a JSON file and then referring to it in the command.
$aws --endpoint-url=[http://localhost:4566](http://localhost:4566/)\
 sqs set-queue-attributes \
 --queue-url=http://localhost:4566/000000000000/tutorial-queue\
 --attributes DelaySeconds=50,\
MaximumMessageSize=100,\
MessageRetentionPeriod=2600,\
ReceiveMessageWaitTimeSeconds=4,\
VisibilityTimeout=4,\
RedrivePolicy="\"{\\\"deadLetterTargetArn\\\":\\\"arn:aws:sqs:us-east-1:000000000000:tutorial-dlq-sqs\\\",\\\"maxReceiveCount\\\":\\\"1\\\"}\""
Using JSON in the command:
$aws --endpoint-url=[http://localhost:4566](http://localhost:4566/)\
 sqs set-queue-attributes \
 --queue-url=http://localhost:4566/000000000000/tutorial-queue-attributes-as-json\
 --attributes '{
     "DelaySeconds": "50",
     "MaximumMessageSize": "100",
     "MessageRetentionPeriod": "2600",
     "ReceiveMessageWaitTimeSeconds": "4",
     "VisibilityTimeout": "4",
     "RedrivePolicy": "{\"deadLetterTargetArn\":\"arn:aws:sqs:us-east-1:000000000000:tutorial-dlq-sqs\",\"maxReceiveCount\":\"1\"}"
}'
The command to create a file:
$echo '{
     "DelaySeconds": "50",
     "MaximumMessageSize": "100",
     "MessageRetentionPeriod": "2600",
     "ReceiveMessageWaitTimeSeconds": "4",
     "VisibilityTimeout": "4",
     "RedrivePolicy": "{\"deadLetterTargetArn\":\"arn:aws:sqs:us-east-1:000000000000:tutorial-dlq-sqs\",\"maxReceiveCount\":\"1\"}"
}' > set-attributes-sqs.json
The command to set queue attributes from the JSON file:
$aws --endpoint-url=http://localhost:4566\
 sqs set-queue-attributes \
 --queue-url=http://localhost:4566/000000000000/tutorial-queue-attributes-as-json-file\
 --attributes file**:**//set-attributes-sqs.json
Send a message:
To send a message to a queue and its optional attributes below command is used:
$aws --endpoint-url=http://localhost:4566\
 sqs send-message\
 --queue-url=http://localhost:4566/000000000000/tutorial-queue\
 --delay-seconds=5\
 --message-body={'{"message": "Hello world!"}'}\
 --message-attributes 'attribute1={DataType=String, StringValue="attribute1Value"},attribute2={DataType=StringList, StringListValues=["attribute2Value1","attribute2Value2"]}'

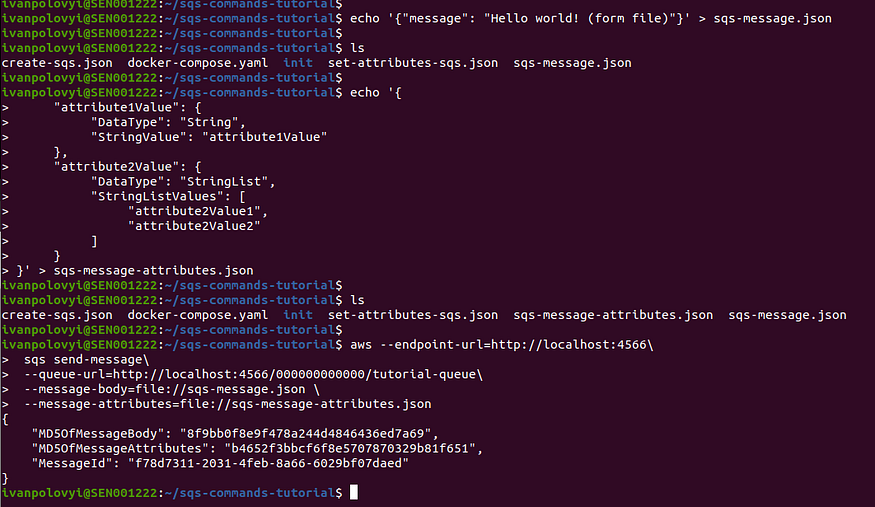
We can save a message and its attributes in separate files and then refer to those files in the command.
The command to create a file with a message:
$echo '{"message": "Hello world! (form file)"}' > sqs-message.json
The command to create a file with attributes of the above message:
$echo '{
     "attribute1Value": {
          "DataType": "String",
          "StringValue": "attribute1Value"
     },
     "attribute2Value": {
          "DataType": "StringList",
          "StringListValues": [
               "attribute2Value1",
               "attribute2Value2"
          ]
     }
}' > sqs-message-attributes.json
The send message command referencing previously created files:
$aws --endpoint-url=http://localhost:4566\
 sqs send-message\
 --queue-url=http://localhost:4566/000000000000/tutorial-queue\
 --message-body=file://sqs-message.json \
 --message-attributes=file://sqs-message-attributes.json
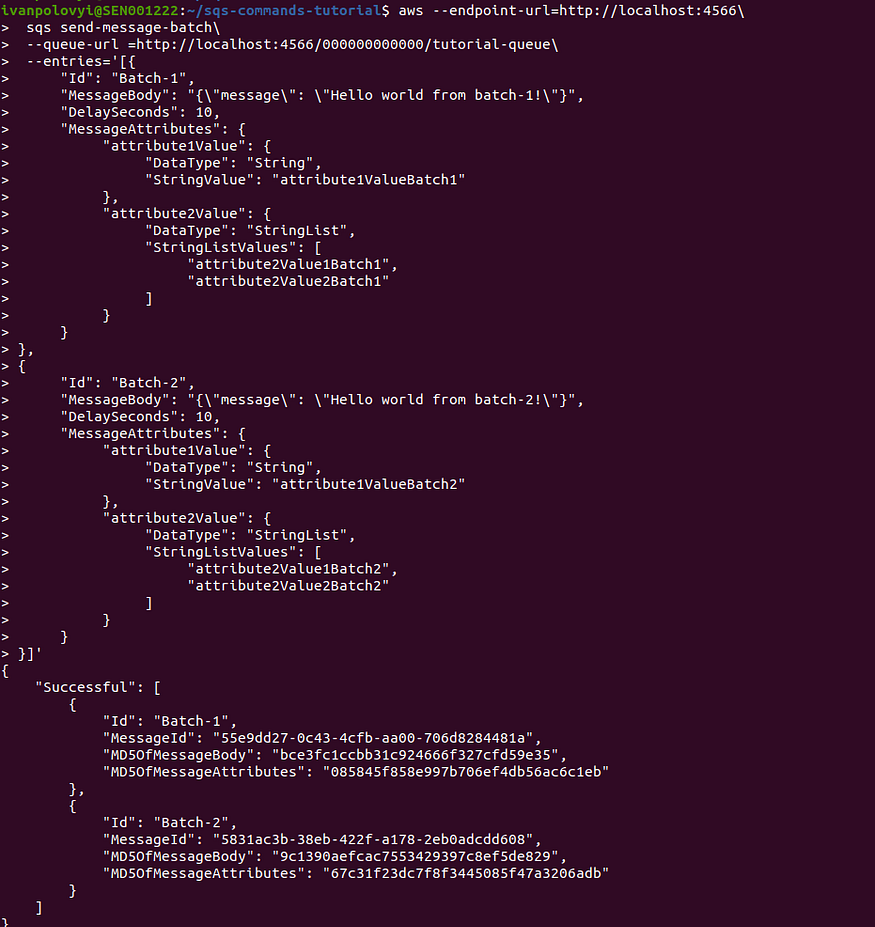
Send messages in a batch:
We can send multiple messages in the batch using the below command:
$aws --endpoint-url=[http://localhost:4566\](http://localhost:4566/)
 sqs send-message-batch\
 --queue-url =http://localhost:4566/000000000000/tutorial-queue\
 --entries='[{
     "Id": "Batch-1",
     "MessageBody": "{\"message\": \"Hello world from batch-1!\"}",
     "DelaySeconds": 10,
     "MessageAttributes": {
          "attribute1Value": {
               "DataType": "String",
               "StringValue": "attribute1ValueBatch1"
          },
          "attribute2Value": {
               "DataType": "StringList",
               "StringListValues": [
                    "attribute2Value1Batch1",
                    "attribute2Value2Batch1"
               ]
          }
     }
},
{
     "Id": "Batch-2",
     "MessageBody": "{\"message\": \"Hello world from batch-2!\"}",
     "DelaySeconds": 10,
     "MessageAttributes": {
          "attribute1Value": {
               "DataType": "String",
               "StringValue": "attribute1ValueBatch2"
          },
          "attribute2Value": {
               "DataType": "StringList",
               "StringListValues": [
                    "attribute2Value1Batch2",
                    "attribute2Value2Batch2"
               ]
          }
     }
}]'
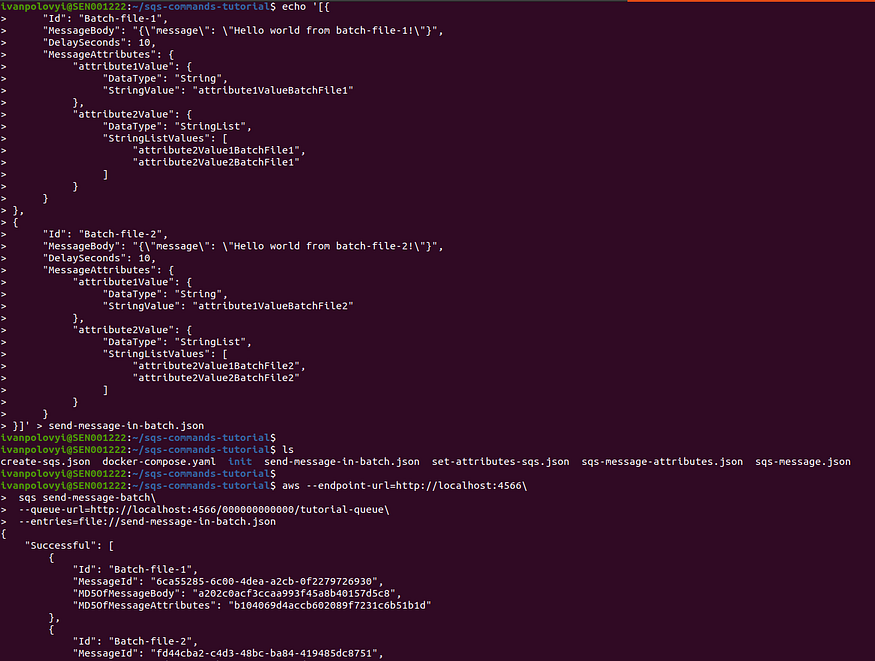
As always, we can save messages in the file and then use this file in the command to send messages in the batch. The command to create the file with messages:
$echo '[{
     "Id": "Batch-file-1",
     "MessageBody": "{\"message\": \"Hello world from batch-file-1!\"}",
     "DelaySeconds": 10,
     "MessageAttributes": {
          "attribute1Value": {
               "DataType": "String",
               "StringValue": "attribute1ValueBatchFile1"
          },
          "attribute2Value": {
               "DataType": "StringList",
               "StringListValues": [
                    "attribute2Value1BatchFile1",
                    "attribute2Value2BatchFile1"
               ]
          }
     }
},
{
     "Id": "Batch-file-2",
     "MessageBody": "{\"message\": \"Hello world from batch-file-2!\"}",
     "DelaySeconds": 10,
     "MessageAttributes": {
          "attribute1Value": {
               "DataType": "String",
               "StringValue": "attribute1ValueBatchFile2"
          },
          "attribute2Value": {
               "DataType": "StringList",
               "StringListValues": [
                    "attribute2Value1BatchFile2",
                    "attribute2Value2BatchFile2"
               ]
          }
     }
}]' > send-message-in-batch.json

The command to send a message using a file:

$aws --endpoint-url=http://localhost:4566\
 sqs send-message-batch\
 --queue-url=http://localhost:4566/000000000000/tutorial-queue\
 --entries=file://send-message-in-batch.json
How to send messages on Localstack initialization is explained here.
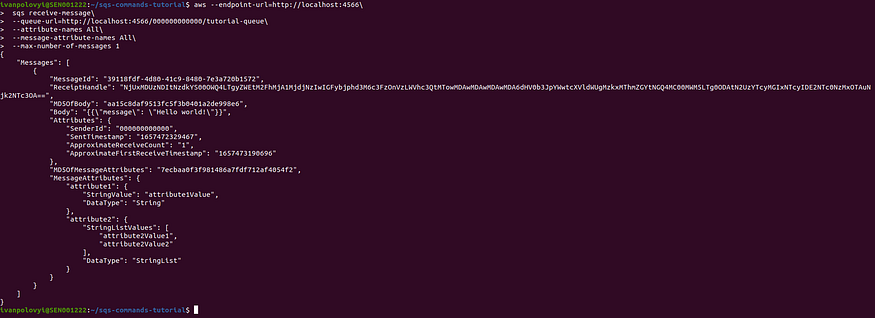
Receive a message:
You can receive all messages or the output can be limited to the quantity specified in the command. Optionally, the command below can return message attributes as well.
$aws --endpoint-url=http://localhost:4566\
 sqs receive-message\
 --queue-url=http://localhost:4566/000000000000/tutorial-queue\
 --attribute-names All\
 --message-attribute-names All\
 --max-number-of-messages 1
Delete a message:
To delete a message we have to get its receipt handle from the previous command and then refer to it in the command below:
$aws --endpoint-url=http://localhost:4566\
 sqs delete-message\
 --queue-url=http://localhost:4566/000000000000/tutorial-queue\
 --receipt-handle=NjUxMDUzNDItNzdkYS00OWQ4LTgyZWEtM2FhMjA1MjdjNzIwIGFybjphd3M6c3FzOnVzLWVhc3QtMTowMDAwMDAwMDAwMDA6dHV0b3JpYWwtcXVldWUgMzkxMThmZGYtNGQ4MC00MWM5LTg0ODAtN2UzYTcyMGIxNTcyIDE2NTc0NzMxOTAuNjk2NTc3OA=

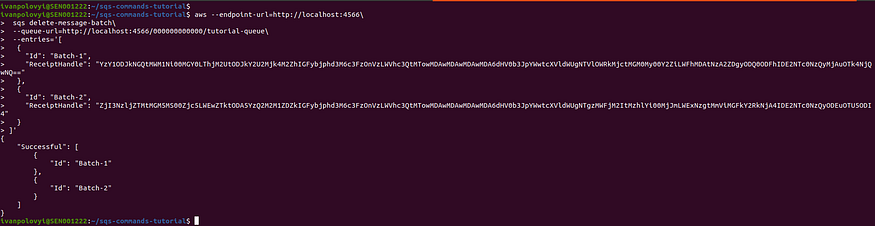
Delete message in a batch:
As well as sending messages in the batch we can delete messages in the batch by using this command. Note that messages receipt handles we have to get from the receive message command:
$aws --endpoint-url=http://localhost:4566\
 sqs delete-message-batch\
 --queue-url=http://localhost:4566/000000000000/tutorial-queue\
 --entries='[
  {
    "Id": "Batch-1",
    "ReceiptHandle": "YzY1ODJkNGQtMWM1Ni00MGY0LThjM2UtODJkY2U2Mjk4M2ZhIGFybjphd3M6c3FzOnVzLWVhc3QtMTowMDAwMDAwMDAwMDA6dHV0b3JpYWwtcXVldWUgNTVlOWRkMjctMGM0My00Y2ZiLWFhMDAtNzA2ZDgyODQ0ODFhIDE2NTc0NzQyMjAuOTk4NjQwNQ=="
  },
  {
    "Id": "Batch-2",
    "ReceiptHandle": "ZjI3NzljZTMtMGM5MS00Zjc5LWEwZTktODA5YzQ2M2M1ZDZkIGFybjphd3M6c3FzOnVzLWVhc3QtMTowMDAwMDAwMDAwMDA6dHV0b3JpYWwtcXVldWUgNTgzMWFjM2ItMzhlYi00MjJmLWExNzgtMmViMGFkY2RkNjA4IDE2NTc0NzQyODEuOTU5ODI4"
  }
]**'**
We can create a file with all messages that we want to delete and then use this file in the command:
$echo '[
  {
    "Id": "Batch-from-file-1",
    "ReceiptHandle": "NDkzMTdmMGYtNzg5ZS00MTZmLTllNGQtM2I3ZTMzYjUyYmQ3IGFybjphd3M6c3FzOnVzLWVhc3QtMTowMDAwMDAwMDAwMDA6dHV0b3JpYWwtcXVldWUgNmNhNTUyODUtNmMwMC00ZGVhLWEyY2ItMGYyMjc5NzI2OTMwIDE2NTc0NzQ0NDAuMzMxNDY4"
  },
  {
    "Id": "Batch-from-file-2",
    "ReceiptHandle": "NGNhNzBlODMtOWQzOS00ODVkLWEwYTktNzZmMjAxZDBiMmZjIGFybjphd3M6c3FzOnVzLWVhc3QtMTowMDAwMDAwMDAwMDA6dHV0b3JpYWwtcXVldWUgZmQ0NGNiYTItYzRkMy00OGJjLWJhODQtNDE5NDg1ZGM4NzUxIDE2NTc0NzQ0NjYuMTEzNDQ1"
  }
]' > delete-messages-in-batch.json
When a file is created, refer to it in the command below:
$aws --endpoint-url=http://localhost:4566\
 sqs delete-message-batch\
 --queue-url=http://localhost:4566/000000000000/tutorial-queue\
 --entries=file://delete-messages-in-batch.json

Purge a queue:
To remove all messages from a queue the below command is used:
$aws --endpoint-url=http://localhost:4566\
 sqs  purge-queue\
 --queue-url=http://localhost:4566/000000000000/tutorial-queue
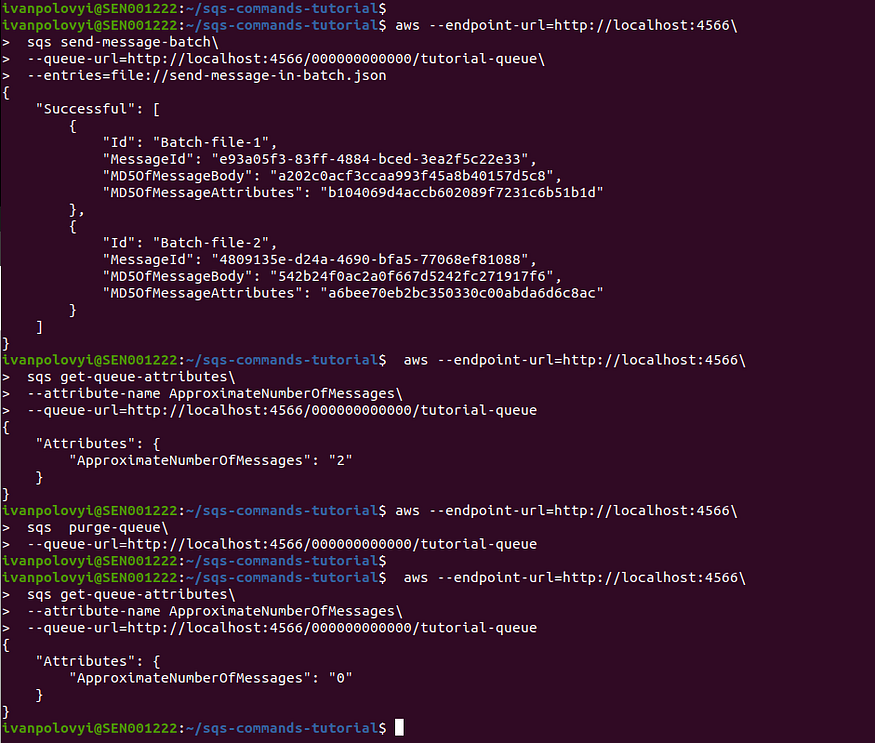
Delete queues:
To delete the queue regardless of the queue’s contents the below command is used:
$aws --endpoint-url=http://localhost:4566\
 sqs  delete-queue\
 --queue-url=http://localhost:4566/000000000000/tutorial-queue
As I wrote in the beginning all commands shown here will function with the queues in the cloud. When using those commands with queues hosted in the cloud you won't need to specify
--endpoint-url=http://localhost:4566
As it is used to point the command to the Localstack running in the Docker container locally. You may need to add the below option for the command if you need to specify a different profile (credentials) to access the cloud as long as you have a profile created in the credentials file located in the .aws directory.
--profile=<profile-name>
Conclusion
This was a practical guide on how to manage AWS SQS using AWS CLI. Thank you for reading! Please like and follow. If you have any questions or suggestions, please feel free to write me on my LinkedIn account.
Comments
Loading comments…