Overview
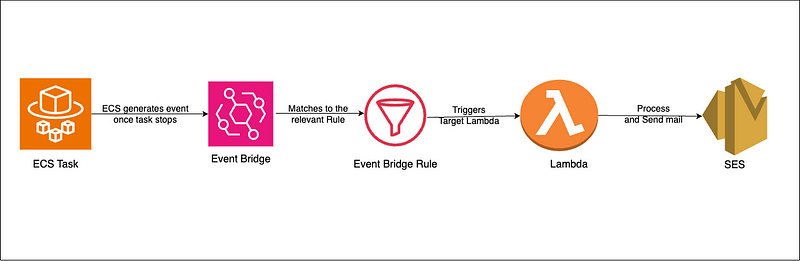
In this article, we’ll dive into how to create an effective alert system for monitoring AWS Elastic Container Service (ECS) task terminations. Whether you’re managing critical applications or ensuring the smooth operation of your services, it’s vital to stay informed about the status of your ECS tasks. By leveraging AWS Lambda and Simple Email Service (SES), we can develop a serverless solution to send notifications whenever an ECS task stops.
This guide will provide you with a step-by-step approach, from setting up to writing and deploying a Lambda function, ensuring you’re promptly alerted about any task terminations.
Pre-requisite
Both sender and receiver email address verified in AWS SES dashboard. Refer AWS documentation.
Writing the lambda function
We will use serverless framework to create the lambda function
Configuration
- Configure serverless
- Install serverless if you haven’t already
npm install -g serverless
- Initialize the project
serverless
- Choose Node.js starter from the list

- Provide a name
- No option for all other
3.Install AWS SDK
npm install aws-sdk
4. Configure Serverless file
- Update the Provider with the following values
provider:
  name: aws
  runtime: nodejs18.x
  region: ap-southeast-1
  stage: ${opt:stage, 'dev'}
Here we are setting dev as the default value for stage.
- Let us create roles and policies needed to execute the lambda Lambda should be able to send email, have logs and get information from ECS task.
resources:
  Resources:
    NotifyAlertLambdaExecutionRole:
      Type: "AWS::IAM::Role"
      Properties:
        RoleName: !Sub ${self:provider.stage}-notify-alert-lambda-execution-role
        AssumeRolePolicyDocument:
          Version: "2012-10-17"
          Statement:
            - Effect: "Allow"
              Principal:
                Service:
                  - "lambda.amazonaws.com"
              Action: "sts:AssumeRole"
        Policies:
          - PolicyName: !Sub ${self:provider.stage}-notify-alert-lambda-execution-policy
            PolicyDocument:
              Version: "2012-10-17"
              Statement:
                - Effect: "Allow"
                  Action:
                    - "ses:SendEmail"
                    - "ses:SendRawEmail"
                  Resource: "*"
                - Effect: "Allow"
                  Action:
                    - "logs:CreateLogGroup"
                    - "logs:CreateLogStream"
                    - "logs:PutLogEvents"
                  Resource: "*"
                - Effect: "Allow"
                  Action:
                    - "ecs:DescribeTasks"
                    - "ecs:ListTasks"
                  Resource: "*"
Now we can configure the lambda configurations
functions:
  notification-alerts:
    handler: src/notifyAlerts.notifyAlerts
    role: NotifyAlertLambdaExecutionRole
    environment:
      STAGE: ${self:provider.stage}
    events:
      - cloudwatchEvent:
          event:
            source:
              - 'aws.ecs'
              - "ecs.amazonaws.com"
            detail-type:
              - 'ECS Task State Change'
            detail:
              lastStatus:
                - "STOPPED"
              clusterArn:
                - !Sub arn:aws:ecs:${self:provider.region}:${AWS::AccountId}:cluster/peace-${self:provider.stage}-cluster
In this process, we attach a role and pass the ‘STAGE’ environment variable to our code. This allows the code to behave differently based on the environment. For example, we can send emails to different recipients depending on whether we’re in a development, staging, or production environment. However, if your codebase will have the same implementation regardless of the environment, you don’t have to pass this variable.
Note: In our event configuration, we’ve specified ‘aws.ecs’ and ‘ecs.amazonaws.com’ as event sources. We will discuss this under testing.
Implementation
- Create directory src and create a file called notifyAlerts.js
const aws = require('aws-sdk');
// Change the region as needed
const ses = new aws.SES({region: 'ap-southeast-1'});

exports.notifyAlerts = async (event) => {
    const params = {
        // Verify this email in SES
        Source: `critical-alerts@email-address.com`,

        // Verify recipient email as well
        Destination: {
            ToAddresses: ['email-address'],
        },
        Message: {
            Subject: {Data: `Server Stopped at ${event.time}`},
            Body: {
                Text: {Data: `More details: ${JSON.stringify(event)}`}
            }
        }
    };

    try {
        await ses.sendEmail(params).promise();
        console.log('Email sent successfully');
    } catch (error) {
        console.error('Error sending email', error);
        throw error;
    }
};
Execution
Execute the below command.
sls deploy
Testing
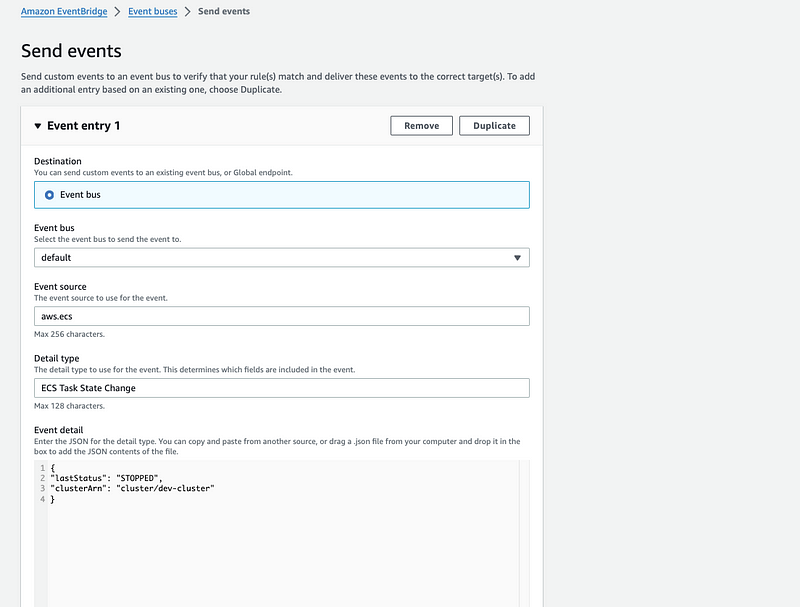
Navigate to default Event bus in the Event Bridge dashboard. Click on to Send events button on the top.

This is a sample testing setup.
- Update the clusterArn with the relevant value.
Once you click send event, you might encounter an error as shown below.

This happens because custom event sources shouldn’t start with ‘aws.’, as this prefix is reserved for AWS service events. Hence, we are using ‘ecs.amazonaws.com’ for our custom test events. We can use anything as source name, even your name.

We have to specify ‘ecs.amazonaws.com’ in the serverless.yml file as a source for this to work which we have done already.
PS
Find the complete code in this repository: Github link: ECS State Notifier
Comments
Loading comments…