GraphQL File Uploads Server Side with NestJS

Ever been in that coding struggle where you’re trying to make GraphQL play nice with file uploads, and it feels like the info you need is scattered all over the place? Been there, and felt that frustration. So, guess what? I decided to fix it.
In this two-part tutorial, we’re diving into the nitty-gritty of GraphQL file uploads, using NestJS, Firebase, NuxtJS 3, and a bit of Apollo Client magic. It’s the guide I wished I had when I was elbow-deep in the code. Let’s turn that frustration into a coding victory together! Ready to simplify the whole process? Let’s roll! 🚀
Alright, fellow devs, buckle up! We’re diving into the practical side of things, and we will be using graphql-upload. This nifty package is our ticket to smoothly handling file uploads in GraphQL.
Step 1: Initiating Your NestJS GraphQL Adventure
Create a New NestJS Project
Use the Nest CLI to set up a fresh NestJS project. Open your terminal and execute:
npx @nestjs/cli new graphQlFileUpload
Configure GrapghQL, Typeorm and PostgreSQL
To configure GraphQL with TypeORM and PostgreSQL in your NestJS project, refer to the NestJS GraphQL documentation for setting up the GraphQL module. Follow the TypeORM documentation for configuring TypeORM.
Step 2: Configure Middleware for graphql-upload
The only version that worked for me was v14. Install graphql-upload install it by running:
npm install graphql-upload@14
Now, in src/main.ts, configure the middleware for graphql-upload:
import { NestFactory } from ''@nestjs/core'';
import { AppModule } from ''./app.module'';
import { Logger } from ''@nestjs/common'';
import * as graphqlUploadExpress from ''graphql-upload/graphqlUploadExpress.js'';

async function bootstrap() {
  const app = await NestFactory.create(AppModule);
  app.enableCors();
  app.use(graphqlUploadExpress({ maxFileSize: 100000, maxFiles: 10 }));
  await app.listen(process.env.SERVER_PORT || 3000);
  Logger.log(
    `Server Running on http://localhost:${process.env.SERVER_PORT}/graphql`,
    ''Bootstrap'',
  );
}
bootstrap();
Step 3: Create the Upload Service
we’re introducing the UploadService to handle file uploads and deletions. This service utilizes Firebase Storage for efficient file management. Below is the code for your UploadService:
You can easily replace the Firebase implementation with other services like AWS S3
Step 4: Scaffold the blog entity, resolvers, and services
Scaffold the blog entity, resolvers, and services in your NestJS project by generating a Blog entity, along with corresponding resolvers and services using the Nest CLI. Define GraphQL operations in blog.resolver.ts and implement the necessary methods in blog.service.ts to interact with the Blog entity.
Code here: https://gist.github.com/eadortsu/a9b715369ace30d2cef1df547911da10
In your CreateBlogInput, include a GraphQL field decorator specifying the type as GraphQLUpload and the class as Upload.
//create-blog.input.ts

import { InputType, Field } from ''@nestjs/graphql'';
import * as GraphQLUpload from ''graphql-upload/GraphQLUpload.js'';
import * as Upload from ''graphql-upload/Upload.js'';

@InputType()
export class CreateBlogInput {
  @Field(() => GraphQLUpload, {
    nullable: true,
    description: ''Images file'',
  })
  imageFile: Upload;

/*
rest of your code
*/
In the blog service, you can effortlessly handle image uploads like this:
// Check if an image is provided
if (imageFile) {
  // Retrieve the image
  const image = await imageFile;
// Upload the image to Firebase and update the blog input
  blogInput.image = await this.uploadService.uploadToFirebase({
    file: image,
    path: `blog`,
    fileName: blogInput.slug, // You can customize the file name
  });
}
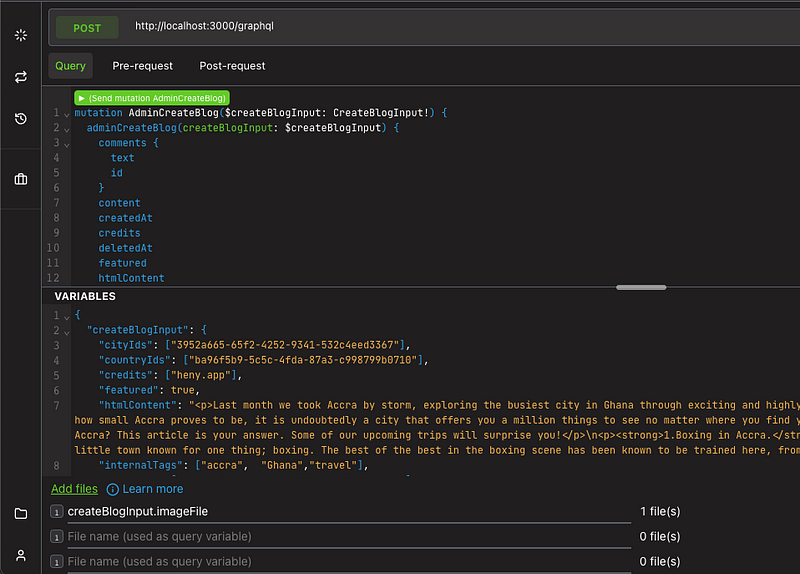
Step 5: Test in Playground
When it comes to testing GraphQL file uploads, the default GraphQL Playground and Postman may not be the ideal choices. In my experience, Altair GraphQL Client has proven to be effective.
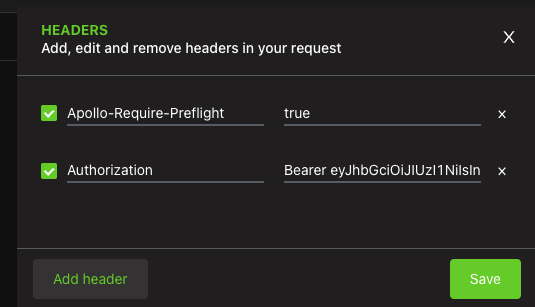
Set Apollo-Require-Preflight Header
Ensure you set a header Apollo-Require-Preflight: true in your requests to avoid CORS errors.
You can now test creating a blog by using the “Add Files” feature to select and attach an image file.
The complete code implementation is available on GitHub at this repository. Stay tuned for the second part, where we’ll delve into the client-side implementation using NuxtJS 3 and Apollo Client.
Comments
Loading comments…