 MongoDB
MongoDB is a source-available cross-platform document-oriented database program. Classified as a NoSQL database program.
Node
Node.js is an open-source, cross-platform, back-end JavaScript runtime environment that runs on the V8 engine and executes JavaScript code outside a web browser.
Express
Express.js, or simply Express, is a back end web application framework for Node.js, released as free and open-source software under the MIT License. It is designed for building web applications and APIs.
Mongoose
Mongoose.js connects your MongoDB clusters or collections with your Node.js app. It enables you to create schemas for your documents. Mongoose provides a lot of functionality when creating and working with schemas.
What’s your takeaway
In this article you will learn how to connect a MongoDB instance with a Node.js application.
Let’s get started… 💃
Prerequisites
- Node.js installed on your machine.
- A MongoDB instance running on your machine.
- Some knowledge of Node.js and Express.js.
- Postman to test the API endpoints.
1. Installing Express and Mongoose
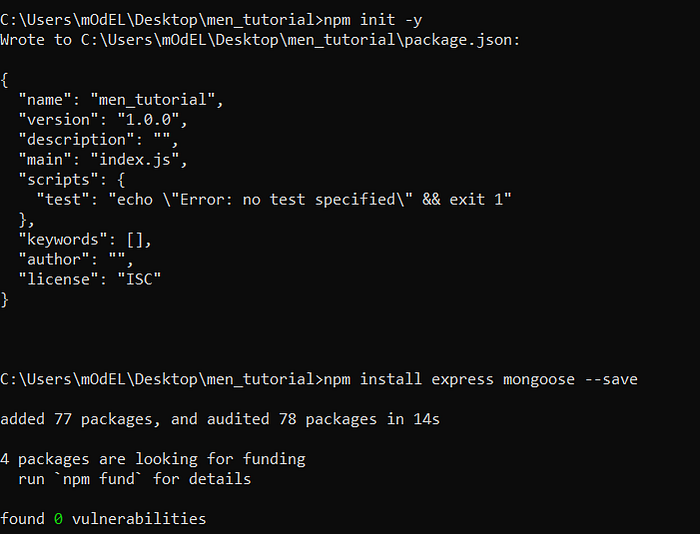
Create a new directory men_tutorial and move to it
Type npm init -y to create a project avoiding npm prompts
Install Express and Mongoose using the command
npm install express mongoose --save
2. Create the connection
Create a new file server.js to start our Express.js server.
Load mongoose and express by adding the following code to server.js.
const express = require("express");
const mongoose = require("mongoose");
const Router = require("./routes");

const app = express();

app.use(express.json());
Then connect to a local MongoDB instance using the mongoose.connect() function. We pass the useNewUrlParser: true, etc. to avoid the [DeprecationWarning](https://mongoosejs.com/docs/deprecations.html).
mongoose.connect("mongodb://localhost:27017/usersdb", {
  useNewUrlParser: true,
});
To make sure your connection was successful, add the following code right below your mongoose.connect().
const db = mongoose.connection;
db.on("error", console.error.bind(console, "connection error: "));
db.once("open", function () {
  console.log("Connected successfully");
});
Then, set the app to listen to port 3000.
app.use(Router);

app.listen(3000, () => {
  console.log("Server is running at port 3000");
});
End of server.js file.
3. Create the schema
Create another file models.js and add the following code.
const mongoose = require("mongoose");
const UserSchema = new mongoose.Schema({
  name: { type: String, required: true },
  lucky_number: { type: Number, default: 0 },
});
const User = mongoose.model("User", UserSchema);
module.exports = User;
We create a schema UserSchema using the mongoose.Schema() method. The schema collects the name and lucky_number fields sent from the request.
We then export the schema using the last 2 lines.
End of model.js file.
4. Creating POST endpoint
Create a new file routes.js. This file defines the endpoints for our app.
Load express and the schema we created in Step 3 by adding the following code.
const express = require("express");
const userModel = require("./models");
const app = express();
Then create the POST endpoint by adding the following code.
app.post("/add_user", async (request, response) => {
  const user = new userModel(request.body);

  try {
    await user.save();
    response.send(user);
  } catch (error) {
    response.status(500).send(error);
  }
});
We create a route /add_user to add a new user to the database. We parse the content to be saved to the database using the line const user = new userModel(request.body);.
We then use a try/catch block to save the object to the database using the .save() method.
5. Creating GET endpoint
Add the following lines of code to the routes.js file.
app.get("/users", async (request, response) => {
  const users = await userModel.find({});

  try {
    response.send(users);
  } catch (error) {
    response.status(500).send(error);
  }
});
We create a route /users to retrieve all the users saved using the /add_user route. We collect these users from the database using the .find() method. We then use a try/catch block to ‘send’ the users to this endpoint.
Finally, export these endpoints by adding the line below.
module.exports = app;
6. Your Application is Ready… 💃
Serve the app by running the command below:
node server.js
Output:

7. Testing the Endpoints using Postman
Postman is an application used for API testing. It is an HTTP client that tests HTTP requests, utilizing a graphical user interface, through which we obtain different types of responses that need to be subsequently validated. Stay tuned for installation and use of Postman here.
Let’s se our application working…
POST
Open Postman and make a POST request to the http://localhost:3000/add_user endpoint.
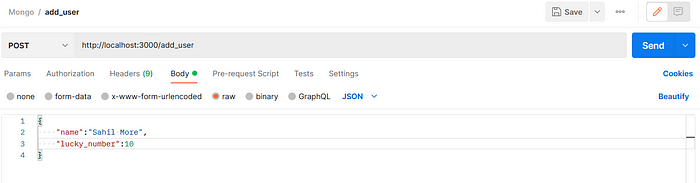
**POST** Request

POST Success
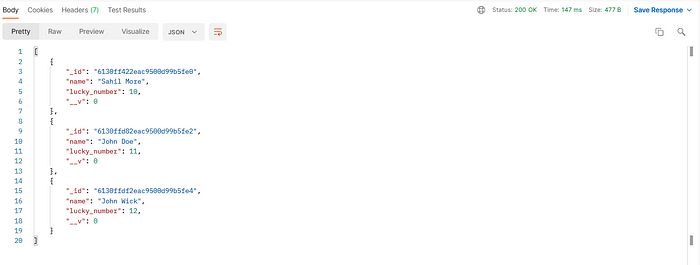
New users will be added to the database as many times we perform the POST request. We will be able to see all the users using the GET endpoint which is also demonstrated below.
GET
Open Postman and make a GET request to the
http://localhost:3000/users endpoint.

GET Request
GET Success
I have added two more users just for demonstration 🙌 Finally, here is it. We have learned how to setup MongoDB using Node.js, Express.js and Mongoose Schemas. You can also connect to MongoDB Atlas or any other database which is located at remote level. The procedure will be the same, you will just have to update the database credentials while making the connection. 🔏 All the files are available on my github here 🚀
Thank You
Hope you guys liked the article 💌
Please let me know by leaving a message in the comments
Post your suggestions on new articles here 📬
You can also buy me a coffee here ☕️
Comments
Loading comments…