
Introduction
This post is to create a client VPN in AWS and with the help of an OpenVPN client, we can connect to privately hosted resources in the VPC like RDS DB, Redshift DB… etc. OpenVPN uses VPN technologies to secure and encrypt data sent over the internet. Its custom VPN protocol uses SSL/TLS for key exchange. OpenVPN Clients can be downloaded from their website. The authentication method shown in this post is Mutual authentication. AWS Client VPN also provides support for MFA. The MFA is only available for Microsoft AD, AD Connector, and when it’s enabled in your IdP. Mutual authentication and Simple AD don’t support MFA.So before we begin let's see what AWS client VPN is.
What is AWS Client VPN?
AWS Client VPN is an AWS-managed client-based VPN service that enables us to securely access your AWS resources. We can access your AWS resources from any location using an OpenVPN-based VPN client with Client VPN.
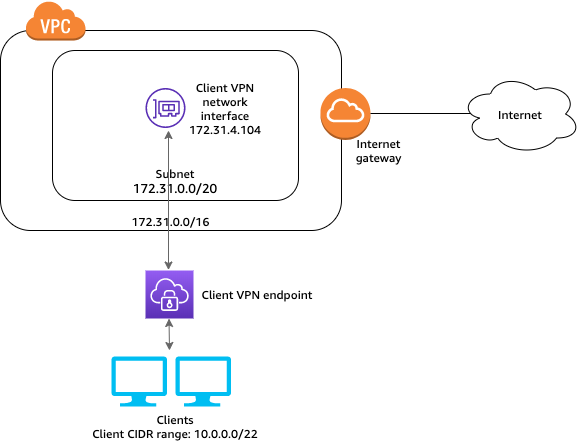
Architecture Diagram
https://docs.aws.amazon.com/vpn/latest/clientvpn-admin/cvpn-getting-started.html
Getting Started
Prerequisite
- VPC with at least a private and public subnet
- Permissions to create Client VPN
- A privately hosted RDS or an EC2 to check and verify the connection
- Permissions to import certificates into AWS Certificate Manager.
Step 1: Generate server and client certificates and keys
We need to generate server and client certificates first. So to generate the server and client certificates follow the following steps
- Clone the OpenVPN easy-rsa repo to your local computer and navigate to the
easy-rsa/easyrsa3folder.
git clone https://github.com/OpenVPN/easy-rsa.git
cd easy-rsa/easyrsa3
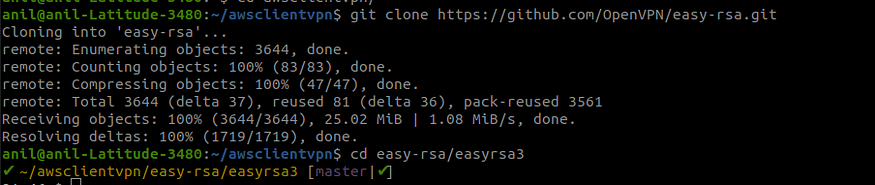
Cloning git repo and changing directory
- Initialize a new PKI environment.
./easyrsa init-pki
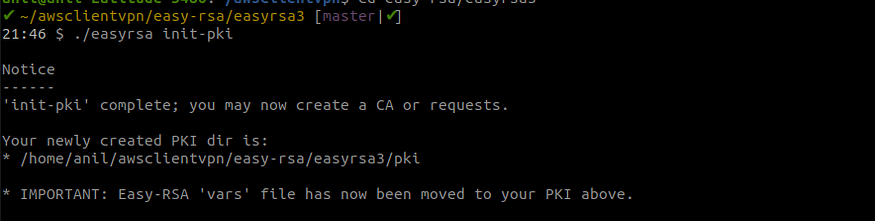
Initializing PKI environment
-
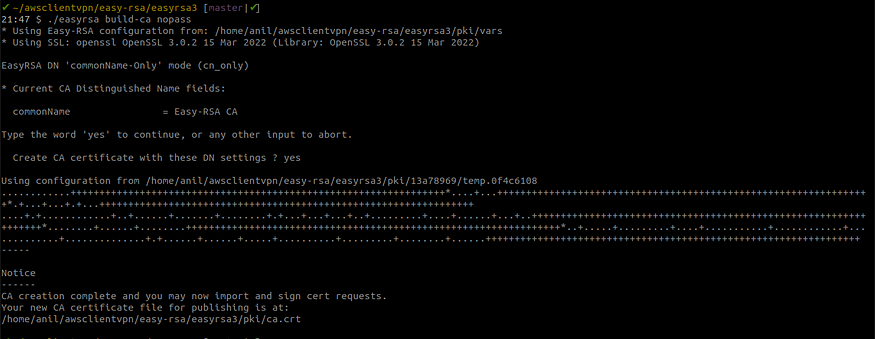
To build a new certificate authority (CA), run this command and follow the prompts.
./easyrsa build-ca nopass
- Generate the server certificate and key.
./easyrsa build-server-full server nopass
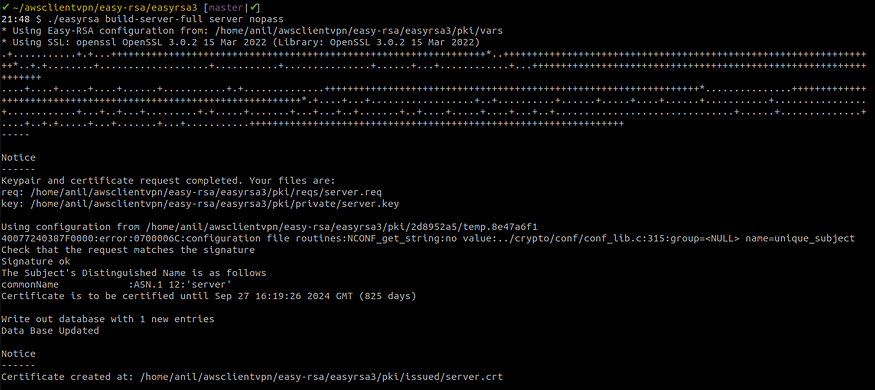
Generating server certificate and key
- Generate the client certificate and key. Make sure to save the client certificate and the client private key because you will need them when you configure the client.
./easyrsa build-client-full client1.domain.tld nopass
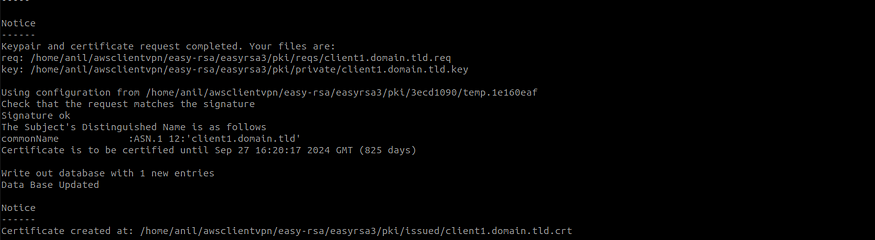
Generating the client certificate and key
You can optionally repeat this step for each client (end user) that requires a client certificate and key.
- Copy the server certificate and key and the client certificate and key to a custom folder and then navigate into the custom folder. Before you copy the certificates and keys, create the custom folder by using the
mkdircommand. The following example creates an awsclientvpn directory in your home directory.
mkdir ~/awsclientvpn/
cp pki/ca.crt ~/awsclientvpn/
cp pki/issued/server.crt ~/awsclientvpn/
cp pki/private/server.key ~/awsclientvpn/
cp pki/issued/client1.domain.tld.crt ~/awsclientvpn
cp pki/private/client1.domain.tld.key ~/awsclientvpn/
cd ~/awsclientvpn/

Listing directory
- Upload the server certificate and key and the client certificate and key to ACM. Be sure to upload them in the same Region in which you intend to create the Client VPN endpoint. The following commands use the AWS CLI to upload the certificates. To upload the certificates using the ACM console instead, see Import a certificate in the AWS Certificate Manager User Guide.
aws acm import-certificate --certificate fileb://server.crt --private-key fileb://server.key --certificate-chain fileb://ca.crtaws acm import-certificate --certificate fileb://client1.domain.tld.crt --private-key fileb://client1.domain.tld.key --certificate-chain fileb://ca.crt

Importing certificates to ACM
Step 2: Create a Client VPN endpoint
To create a Client VPN endpoint
- Open the Amazon VPC console.
- In the navigation pane, choose Client VPN Endpoints and then choose Create Client VPN endpoint.
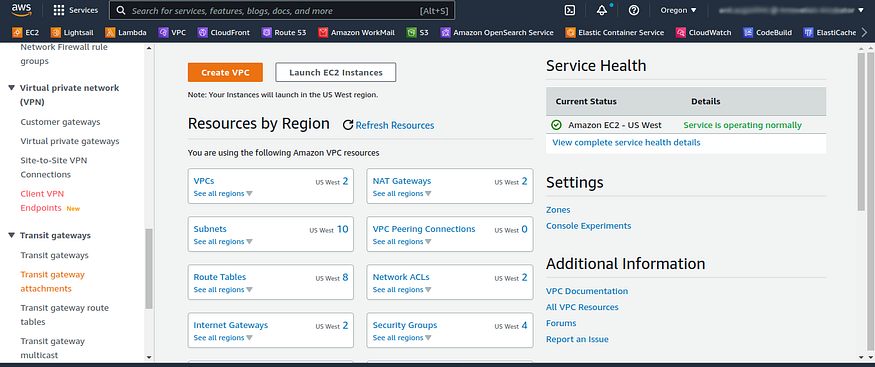
Vpc console
-
(Optional) Provide a name tag and description for the Client VPN endpoint.
-
For Client IPv4 CIDR, specify an IP address range, in CIDR notation, from which to assign client IP addresses. For example,
10.4.0.0/16.
NOTE : The address range cannot overlap with the target network address range, the VPC address range, or any of the routes that will be associated with the Client VPN endpoint. You cannot change the client address range after you create the Client VPN endpoint.
- For Server certificate ARN, select the ARN of the server certificate that you generated in Step 1.
NOTE: Make sure the server certificate is provisioned with or imported into AWS Certificate Manager (ACM) in the same AWS Region.
- Under Authentication options, choose Use mutual authentication, and then for Client certificate ARN, select the ARN of the certificate that we imported in Step 1.
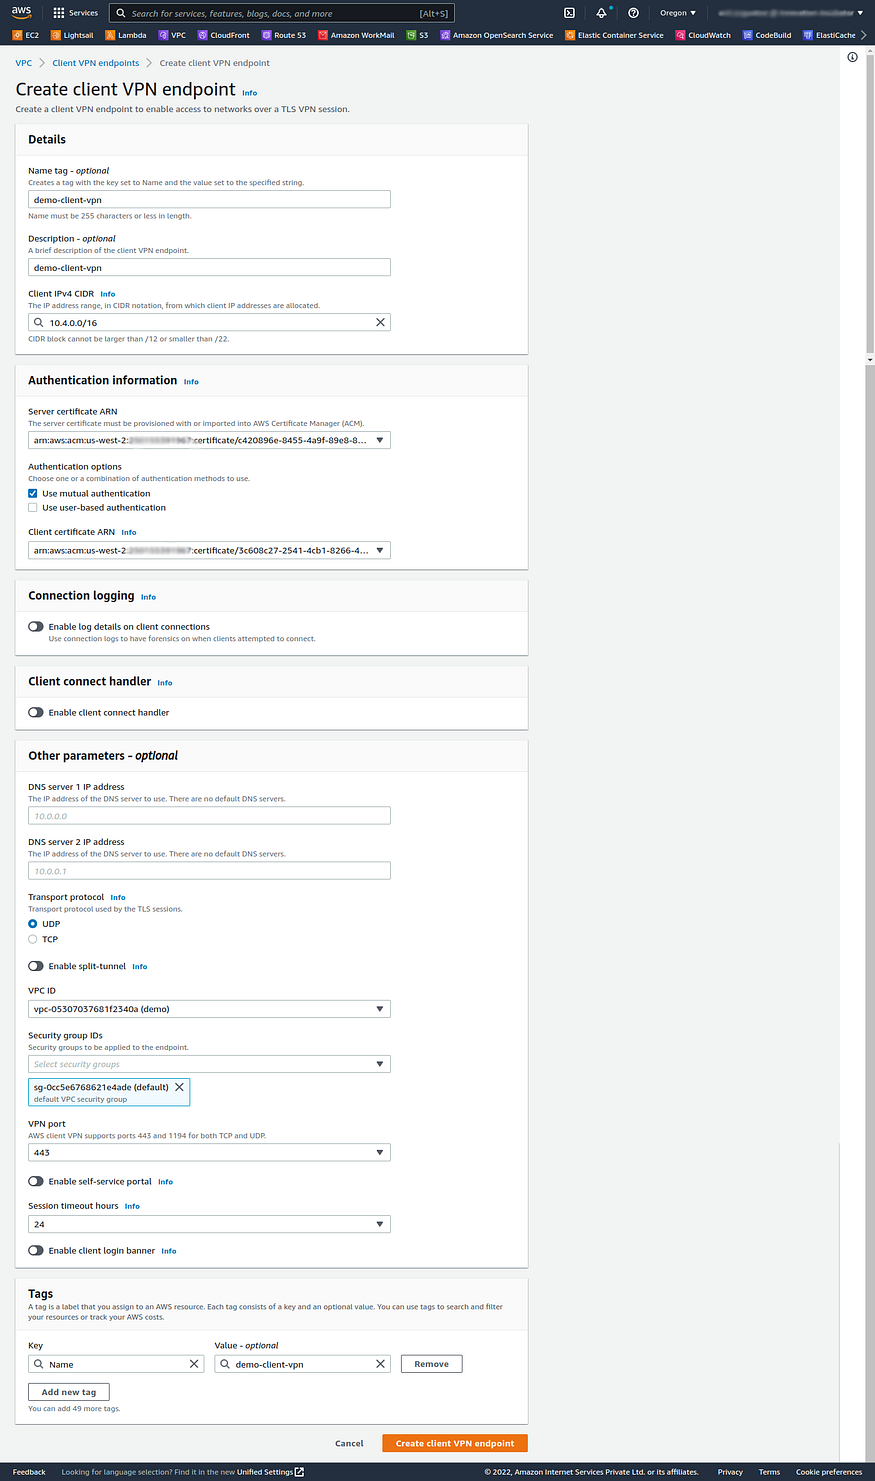
- Keep the rest of the default settings, and choose Create Client VPN endpoint.
After you create the Client VPN endpoint, its state is pending-associate

Client VPN endpoint in Pending associate state
Step 3: Associate a target network
To allow clients to establish a VPN session, we associate a target network with the Client VPN endpoint. A target network is a Public subnet in a VPC. To associate a target network with the Client VPN endpoint follow the following steps
- Open the Amazon VPC console, In the navigation pane, choose Client VPN Endpoints.
- Select the Client VPN endpoint that you created in the preceding procedure, and then choose Target network associations, Associate target network.

target network association tab
-
For VPC, choose the VPC in which our subnet is located.
-
For Choose a subnet to associate, choose the subnet to associate with the Client VPN endpoint.
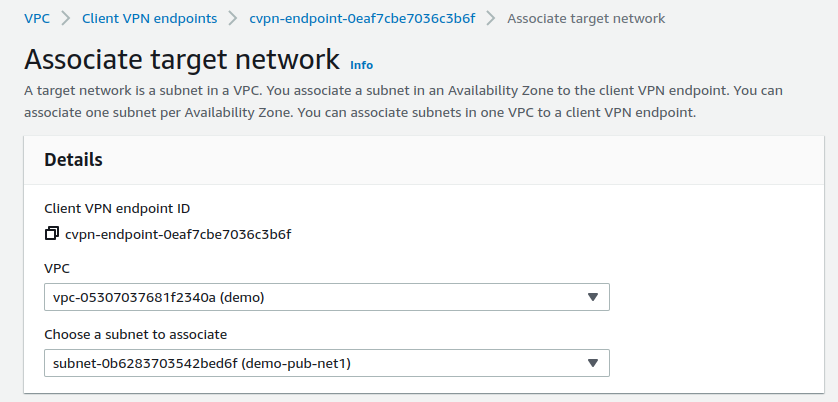
Associating target netowork
- Choose Associate target network.
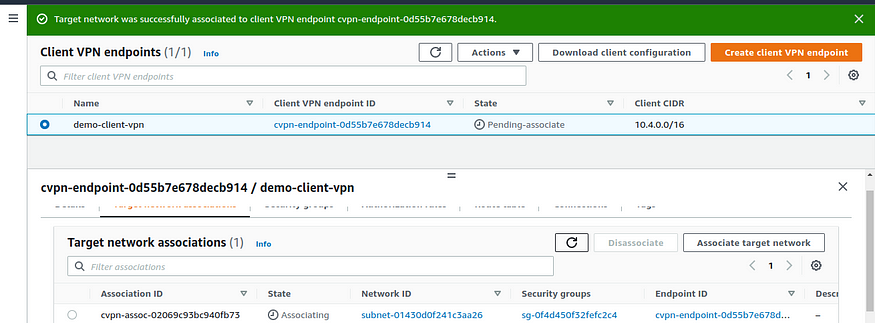
Associating target network
Step 4: Add an authorization rule for the VPC
To add an authorization rule for the VPC follow these steps
- Open the Amazon VPC console, In the navigation pane, choose Client VPN Endpoints.
- Select the Client VPN endpoint to which to add the authorization rule. Choose Authorization rules, and then choose Add authorization rule.
- For Destination network to enable access, enter the CIDR of the network for which you want to allow access. For example, to allow access to the entire VPC, specify the IPv4 CIDR block of the VPC.

Adding authorization rule
-
For Grant access to, choose Allow access to all users.
-
(Optional) For Description, enter a brief description of the authorization rule.
-
Choose Add authorization rule.
Step 5: Provide access to the internet
To provide access to the internet
- Open the Amazon VPC console, In the navigation pane, choose Client VPN Endpoints.
- Select the Client VPN endpoint that you created for this tutorial. Choose Route Table, and then choose Create Route.
- For Route destination, enter
0.0.0.0/0. For Subnet ID for target network association, specify the ID of the subnet through which to route traffic.
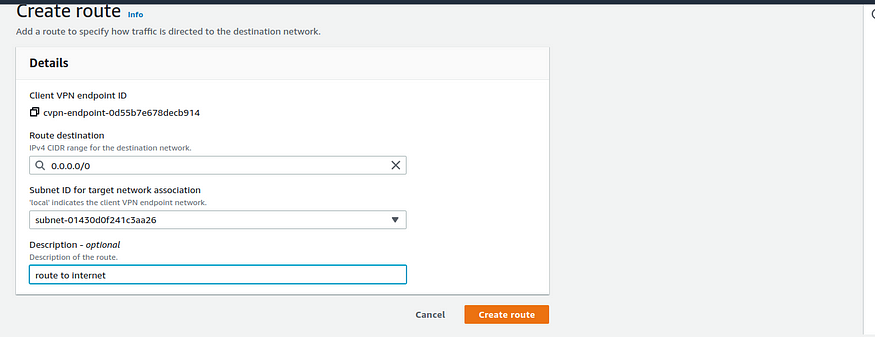
creating route
-
Choose Create Route.
-
Choose Authorization rules, and then choose Add authorization rule.
-
For Destination network to enable access, enter
0.0.0.0/0, and choose Allow access to all users.
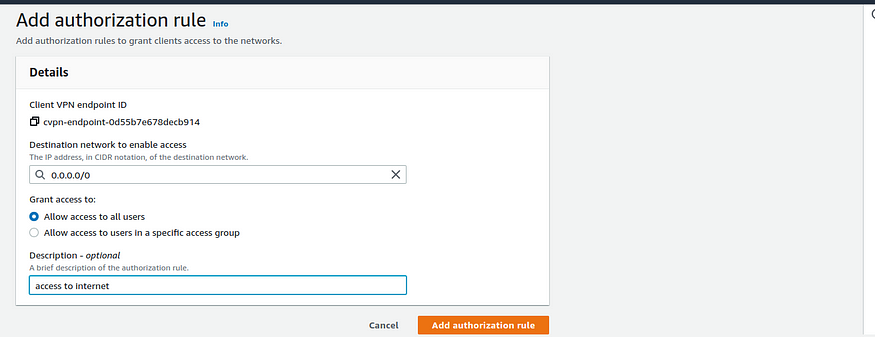
Adding rule to access internet
- Choose Add authorization rule.
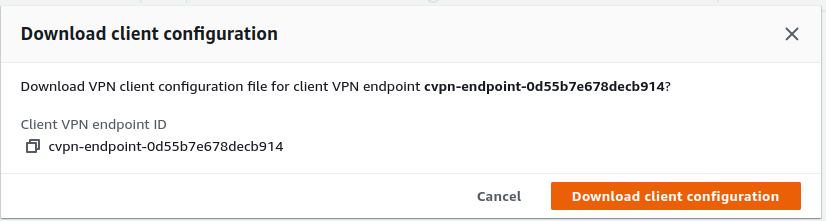
Step 6: Download the Client VPN endpoint configuration file
The next step is to download and prepare the Client VPN endpoint configuration file. We provide this file to the end-users who need to connect to the Client VPN endpoint. To download and prepare the Client VPN endpoint configuration file
- Open the Amazon VPC console, In the navigation pane, choose Client VPN Endpoints.
- Select the Client VPN endpoint that you created for this tutorial, and choose Download client configuration.
- Locate the client certificate and key that were generated in Step 1. The client certificate and key can be found in the following locations in the cloned OpenVPN easy-rsa repo:
- Client certificate —
easy-rsa/easyrsa3/pki/issued/client1.domain.tld.crt - Client key —
easy-rsa/easyrsa3/pki/private/client1.domain.tld.key
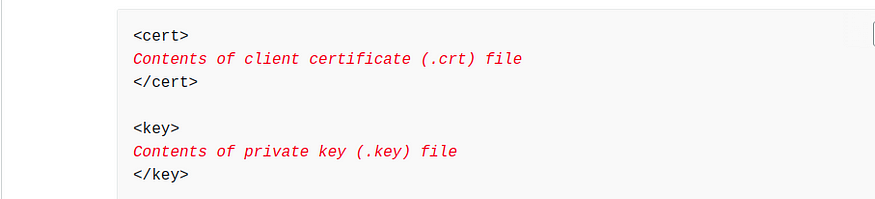
- Open the Client VPN endpoint configuration file using your preferred text editor. Add
and tags to the file. Place the contents of the client certificate and the contents of the private key between the corresponding tags, as such:
- Locate the line that specifies the Client VPN endpoint DNS name, and prepend a random string to it so that the format is
_random_string.displayed_DNS_name_. For example:
- Original DNS name:
cvpn-endpoint-0102bc4c2eEXAMPLE.prod.clientvpn.us-west-2.amazonaws.com - Modified DNS name:
asdfa.cvpn-endpoint-0102bc4c2eEXAMPLE.prod.clientvpn.us-west-2.amazonaws.com

After modifying
-
Save and close the Client VPN endpoint configuration file.
-
Distribute the Client VPN endpoint configuration file to your end-users.
Step 8: Connect to the Client VPN endpoint
Download the OpenVPN client here https://openvpn.net/vpn-client/
Here we used ubuntu and are using the OpenVPN command to connect to VPN
sudo openvpn --config <filename.ovpn>
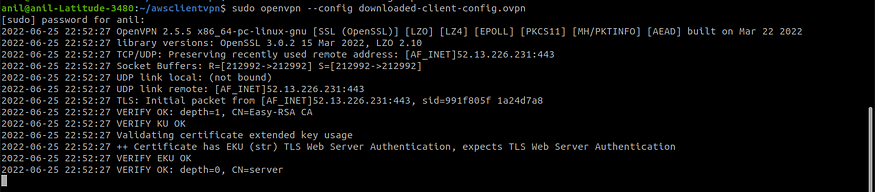
connecting VPN via ubuntu terminal
Step 9: (Optional)Verifying connection to private subnets resources
To test the connection I have set up a private EC2 machine in the same VPC and I’m testing whether I can get connected to it.

Private EC2 machine
So now that we have our instance ready now let's check the connection. Here I used the Netcat command to check the connection to the ssh port of this EC2.

That’s it folks we have successfully created an AWS Client VPN.
Conclusion
I hope this post helped you create an AWS Client VPN. We can use the same VPN endpoint for multiple users. With this VPN you can securely access privately hosted resources in AWS by connecting VPN. As AWS Client VPN is a fully-managed, elastic VPN service, it automatically scales up or down based on user demand, also it is a cloud VPN solution, so you don’t need to install and manage hardware or software-based solutions, or try to estimate how many remote users to support at one time.
Reference
- Pricing: https://aws.amazon.com/vpn/pricing/
- Multiple user solution: https://aws.amazon.com/premiumsupport/knowledge-center/client-vpn-multiple-users-same-endpoint/
- Getting started doc: https://docs.aws.amazon.com/vpn/latest/clientvpn-admin/cvpn-getting-started.html
- Troubleshooting: https://docs.aws.amazon.com/vpn/latest/clientvpn-admin/troubleshooting.html
Comments
Loading comments…