
In this tutorial, we’ll explore how to create a Docker Swarm cluster in AWS, step-by-step. One of the most popular approaches for managing containers in AWS is by using Docker Swarm, which is a native clustering tool.
What is Docker Swarm?
Docker Swarm is a tool that allows you to manage multiple Docker containers as a single cluster, making it easier to deploy and scale applications.
With Docker Swarm, you can distribute containerized applications across multiple nodes and ensure that they are running efficiently and reliably. It provides features such as load balancing, rolling updates, and service discovery, making it a popular choice for managing containerized applications in production environments.
Overall, Docker Swarm simplifies the process of managing large-scale container deployments and helps ensure the availability and scalability of your applications.
Great, now that you are up to speed, let’s take a look at the project.
Tasks:
- Use AWS to create a Docker Swarm that consists of one manager and three worker nodes
- Create one manager node
- Create a service based on the Redis docker image with 4 replicas
- Create a service based on the Apache docker image with 10 replicas
- Create a service based on the Postgres docker image with 1 replica
Prerequisites:
- General Linux knowledge
- Basic knowledge of Docker and containers
- An AWS account with sufficient permissions
Step 1: Configure four instances
First up we will need to configure four instances that we can use to deploy our swarm. This will consist of one manager node and three worker nodes as mentioned above.
To accomplish this task, navigate to the AWS console. Then head on over to the EC2 landing page where we can create our instances.
Once you arrive at the EC2 dashboard click on the orange “Launch instance” button.
We will be creating four instances. To the right, at the top of the page, increase the number of instances to four.
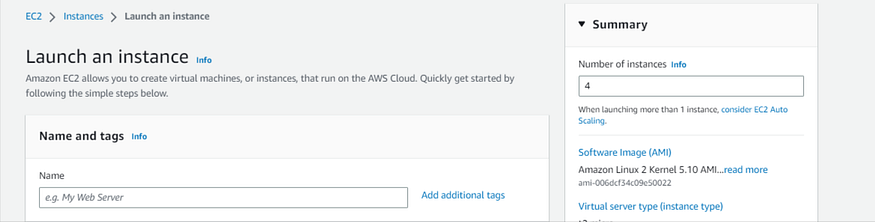
We will be leaving the name section blank and assigning the names once the instances have been configured.
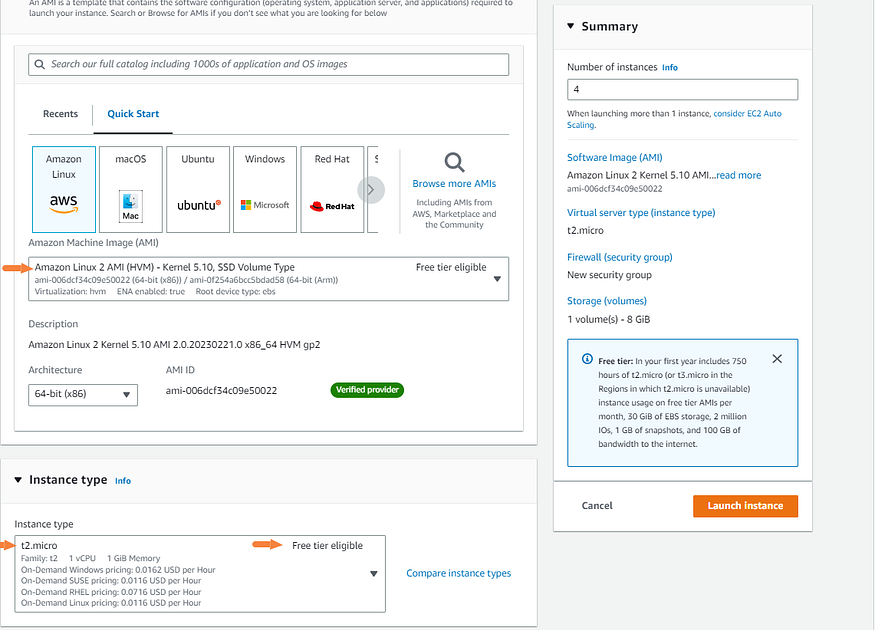
Next, we can select the AMI and the instance type. In today’s demo, we will be using free trier resources. You may need to scale up if your workload is heavy, but for our project, the free-tier will suffice.
Then, create or select a key pair. You will want to keep this safe if you are going to be using SSH to access your server.
Now, it’s time to set up our security group. To edit the security group click on “edit” in the network settings bar.
The security group functions as the firewall for the instances. We will need to open up ports as followed to allow the cluster to communicate with each other, as well as to allow us to access the instances.
Add the following security rules:
- TCP port
2376for secure Docker client communication. This port is required for Docker Machine to work. Docker Machine is used to orchestrate Docker hosts. - TCP port
2377. This port is used for communication between the nodes of a Docker Swarm or cluster. It only needs to be opened on manager nodes. - TCP and UDP port
7946for communication among nodes (container network discovery). - UDP port
4789for overlay network traffic (container ingress networking). - TCP port
22to SSH into our instances remotely
If you are interested in learning more about the following ports, I’ve provided a link here.
Next, we open the advanced details carrot so that we can enter user data for our instances.
Since docker does not come pre-installed with our instances we would have to manually install docker on each machine. We can enter a script into the user data field so that it will run when the instance is spinning up. This way docker will be installed once we launch the instance.
Enter the following script into the user data field:
#!/bin/bash
sudo yum update
sudo yum -y install docker
service docker start
usermod -a -G docker ec2-user
chkconfig docker on
pip3 install docker-compose
Once ready you can click the orange “Launch instance” button.
Note: You will need to reboot all machines after the initial startup for all the commands to take effect!
Since each node(ec2 instance) will have different roles we will need to organize them.

We will have one master node and three other nodes running our specific services.

Note: Generally you’ll want to have more than one master node for backup but since this is a demo it’s acceptable. Check the documentation here.
Step 2: Configure the master and worker nodes
In this step, we will get our master node set up in our cluster. Your master node will handle cluster management tasks such as maintaining the cluster state, scheduling services and serving swarm mode HTTP API endpoints.
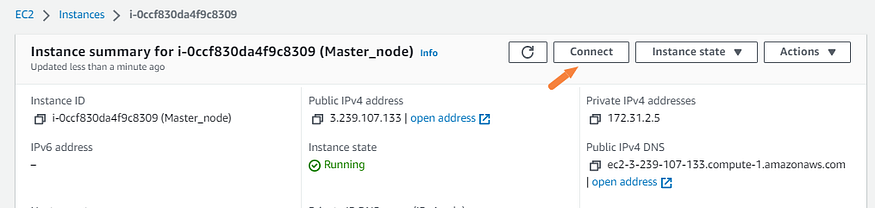
Navigate to your worker node that we had labeled in the previous step. We did open up port 22 for ssh but for simplicity’s sake, I will be using EC2 instance connect through the console. Start the EC2 instance and then click “Connect.”
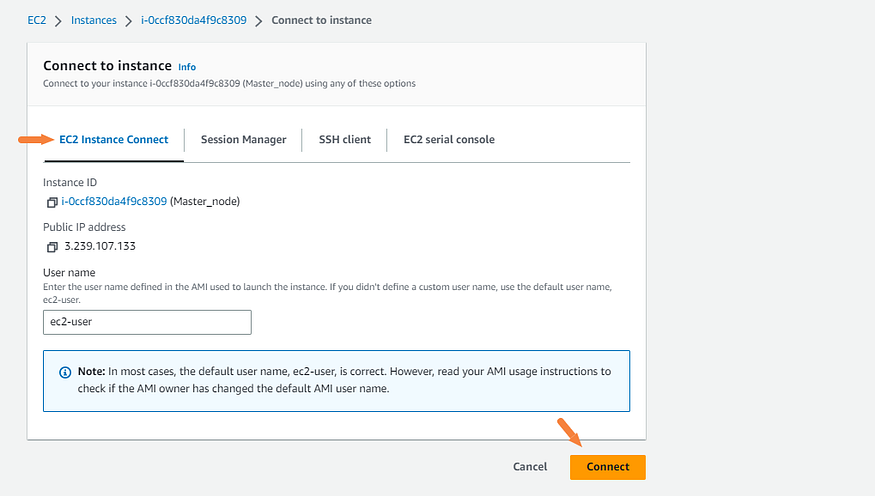
Then make sure you are under the EC2 instance connect tab and click “connect.”
Now that you are in the shell of the instance we will initialize swarm mode.
Enter the following command to configure the master node:
docker swarm init --advertise-addr <private ip of master node>
Note: Make sure to use a private static IP address above. I made the mistake of using a dynamic public IP and this will change after reboot causing the worker nodes to be unable to connect with the master.
You should get the following output from the command. Make sure you copy the command it suggests to add a worker to a swarm. We will be using this in the next step and need to use the token provided.

Now for the worker nodes. Go ahead and open three EC2 instance connect sessions we will need to join all three to the master node using the command from above.


Let’s check our manager node to make sure that the cluster has been configured correctly.
Enter the following command to list nodes:
docker node ls

You can see above and confirm that there is one manager/leader node and three workers.
Great our cluster is configured!
Step 3: Configuring the services
At the beginning of the project, we were tasked with setting up three services within the cluster. In this section, we will create the services from the manager node. We will just be using the default latest in this tutorial that will be pulled from Dockerhub
To converge the Redis service enter the following command:
docker service create --name <name of service> --replicas <# of replicas> <name of image>

To converge the Apache service enter the following command:
docker service create --name <name of service> --replicas <# of replicas> <name of image>

Great one left!
When trying to configure the Postgres services I ran into a small issue. I couldn’t get the task to run successfully. After some research, I found that you need to create a docker secret from within the command line for it to work properly.
If you’re interested in reading more you can find the documentation here.
Enter the following command to converge the Postgres service:
docker service create --name postgres_service --replicas 1 -e POSTGRES_PASSWORD=mypasswd postgres

Our services are now set up and running on our manager node. It’s always best to verify though.
To check the services enter the following command:
docker service ls

As you can see, we have all of our services up and running on our worker nodes!
Step 4: (optional) Using a Stack
In this section, I will go through an alternative way to configure the master and worker nodes with the correct services. Docker stacks can be used to manage the orchestration of Docker containers across multiple nodes.
First, we need to remove the services on the master node that we had configured previously. We will be using identical services for demonstration purposes.
To remove services enter the following command:
docker service rm <service name>
Once you have all the services removed we will create the stack using a Docker compose file and YAML.
First, we need create a directory on the instance of the manager node.
To create a directory enter the following command:
mkdir <directory name>
Then, let’s open up a text editor so that we can create the file for the Docker stack.
Enter the following command to open a text editor.
nano <name of file>
You can copy and paste the text below if you are following along or you can create your own. If you creating your own YAML file you can find additional documentation here.
version:  "3"

services:

web_app:
image:  httpd:latest
deploy:
replicas:  10
placement:
constraints:
-  node.role==worker

data_base:
image:  redis:latest
deploy:
replicas:  4
placement:
constraints:
-  node.role==worker

data_base2:
image:  postgres:latest
environment:
POSTGRES_PASSWORD:  mypasswd
deploy:
replicas:  1
placement:
constraints:
-  node.role==worker
Once your file is ready let’s go ahead and test it. Make sure you are in the directory where the file is located when you run the command.
Enter the following command to deploy the stack:
docker stack deploy --compose-file <name of file><name of stack>

At first glance, it looks like our services have been deployed. Let’s go ahead and double-check.
To confirm the services have been deployed enter the following command:
docker service ls

As you can see in the photo above the correct amount of replicas and services are running.
Let’s also make sure that no stacks are running on the manager node.
Enter the following command:
docker stack ps <name of stack>
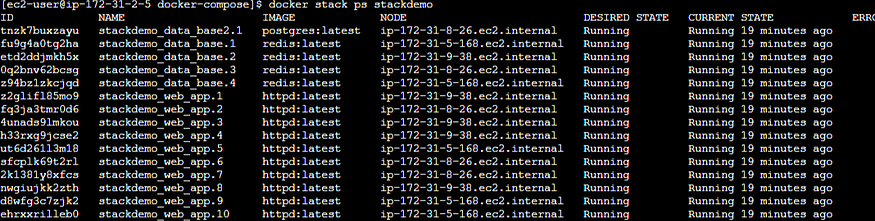
As you can see everything has worked as planned with all services running on the correct nodes.
Make sure and clean up all your nodes and services!
I hope you enjoyed the optional way of configuring services with Docker Swarm.

As always, feel free to join me on this journey of discovery. Whether you come back to this blog, follow me on social media, or reach out to me directly, I would love to continue the conversation, and help you learn more about the exciting world of cloud computing.
Comments
Loading comments…