
In this article, I will walk you through how to create an Amazon EC2 instance with an Nginx web server — all while using the AWS Command Line Interface (AWS CLI) to launch it.
What is Nginx?
Nginx, pronounced “engine-ex”, is an open-source, free to use web server. This means, anyone can use Nginx to host a website. Nginx started out as a web server designed for maximum performance and stability. However, today, it’s also used as a reverse proxy, load balancer, mail proxy and HTTP cache. The software was created by Igor Sysoev and publicly released on October 4, 2004.
Objective
- Create a t.2micro Ec2 (free tier) instance with the OS of your choice.
- In the user-data field, use a script that updates all packages, installs Nginx, and starts the service.
- Verify that the instance has the Nginx web server downloaded and installed through the public IP.
- Make an Amazon Machine Image from the instance you created in step 1.
- Launch the instance and verify you are able to reach your web server from the newly created EC2 instance.
Let’s get started!
1. Install and configure the AWS CLI
aws configure
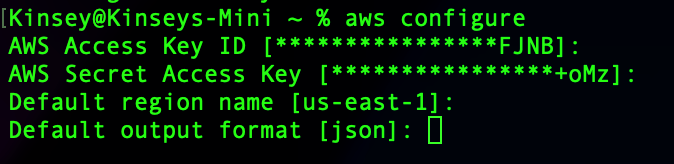
- AWS Access Key ID & Secret Access Key: these are your account credentials — protect them! If you don’t have access keys, you can create them by using the IAM console at https://console.aws.amazon.com/iam/.
- Default region name: I will be using us-east-1 as the default region.
- Default output format: JSON. JavaScript Object Notation is used for transmitting data in web applications.
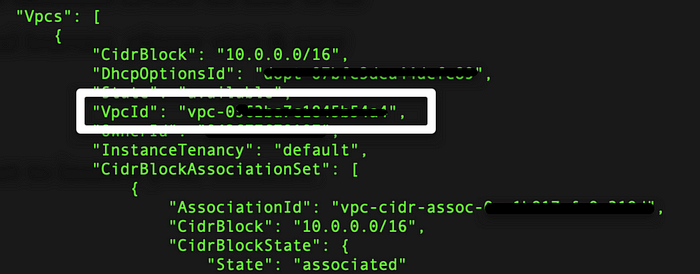
2. Create a security group
Before we run the command to create a security group, we will need to obtain our VPC ID.
What is a VPC? Amazon virtual private cloud (VPC) is a secure, isolated private cloud hosted within a public cloud. With Amazon VPC, you can run code, store data, host websites, and do anything you would do in a private cloud.
Run the following command to obtain your VPC:
aws ec2 describe-vpcs
Next, run the following command to create a security group:
ws ec2 create-security-group --group-name <value> --description <value> --vpc-id <your vpc>
My Ex: aws ec2 create-security-group --group-name Nginx_SG --description "Nginx Project" --vpc-id vpc-09e0a12fc********
Important: paste the GroupID to clipboard, you’ll need it when you create your EC2 instance.
From here, we will want to open up ports 80 & 22 to the newly created security group. This will allow inbound traffic from all IPv4 and SSH access from IPv4 in your network.
Open port 80:
aws ec2 authorize-security-group-ingress --group-name your_group_name --protocol tcp --port 80 --cidr 0.0.0.0/0
My Ex:
aws ec2 authorize-security-group-ingress --group-name Nginx_SG --protocol tcp --port 80 --cidr 0.0.0.0/0
Open port 22:
aws ec2 authorize-security-group-ingress --group-name your_group_name --protocol tcp --port 22 --cidr 0.0.0.0/0
My Ex:
aws ec2 authorize-security-group-ingress --group-name Nginx_SG --protocol tcp --port 22 --cidr 0.0.0.0/0
3. Create a key pair
You’ll use key pairs to connect to your Amazon EC2 instance. A key pair is the combination of a public key and a private key. The public key is used to encrypt data — while the private key is used to decrypt data.
To create a key pair:
aws ec2 create-key-pair --key-name KeyPairName
My Ex:
aws ec2 create-key-pair --key-name NginxKeyPair
To check that you’ve correctly made a key pair, use the following code:
aws ec2 describe-key-pairs --key-name KeyPairName
My Ex:
aws ec2 describe-key-pairs --key-name NginxKeyPair

Success!
4. Install an Nginx web server
For this specific project, we were asked to run a script that will do the following: update all packages, install Nginx, and start the service. To do this, you will need to execute a bootstrap action in the user data. Bootstrapping allows you to write a start-up script so that it’ll carry out commands automatically as the instance launches.
To create a new Vim script, run the following command:
vim Nginx_runscript.sh
In Vim, input the following script:
#!/bin/bash
sudo yum update -y
sudo amazon-linux-extras install nginx1 -y
sudo systemctl enable nginx
sudo systemctl start nginx
5. Launch your instance
Before you launch your EC2 instance, you will need to go to the AWS console and locate your AMI id.
Finding the AMI id: Go to the AWS console, search EC2 > click on Launch instances > copy & paste the AMI to the below code:

Run the following code to launch an EC2 t2.micro instance:
aws ec2 run-instances --image-id ami-xxxxxxxx --count 1 --instance-type t2.micro --key-name KeyPairName --security-group-ids sg-903004f8 --user-data file://apache_runscript.sh
My Ex:
aws ec2 run-instances --image-id ami-0022f774911c1d690 --count 1 --instance-type t2.micro --key-name NginxKeyPair --security-group-ids sg-0f5beb4f565386d72 --user-data file://Nginx_runscript.sh
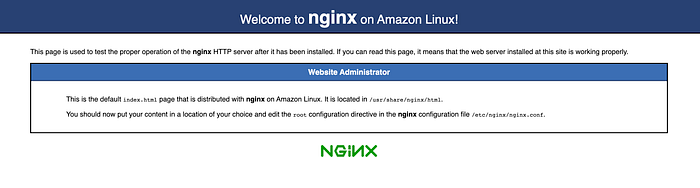
6. Test your Nginx web server
After the instance has been created, and fully initialized, go to a browser and type in the public IP of that instance to verify that Nginx has been installed.
If you also get this image, congratulations — your setup was also successful.
7. Stop & Terminate your EC2 instance
Amazon won’t charge usage for a stopped instance. However, they do charge you for Amazon EBS volume usage.
Run the following code to stop your EC2 instance:
aws ec2 stop-instances --instance-ids <your instance ID>
My Ex:
aws ec2 stop-instances --instance-ids i-099072046cde9daaf
And lastly, run the following code to terminate your EC2 instance:
aws ec2 terminate-instances — instance-ids <your instance ID>
My Ex:
aws ec2 terminate-instances — instance-ids i-099072046cde9daaf
Congratulations! You’ve just configured a Nginx web server using AWS EC2 User Data.
Thank you for reading.
Comments
Loading comments…